 in the Actions column.
Access this dialog by expanding Elements & Forms in the left panel of the Site Administration dashboard and clicking Elements. This dialog provides a central dashboard for administering all Standard and Custom Elements.
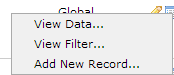
Use it to view or change Element attributes (such as name, description, and category); assign permissions; define layouts, including display templates and render handlers and their settings; and create, manage, import, or export Custom Elements. You can also conveniently retrieve records associated with individual Custom Elements by clicking the View Data icon in the Actions column.
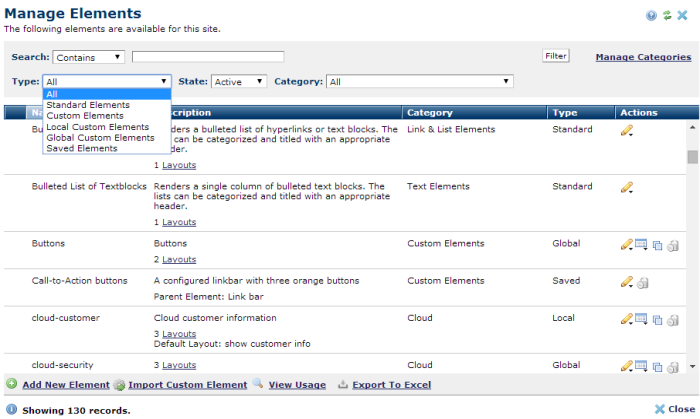
Optionally pick from the following dropdowns, then click the Filter button to limit the number of Element records shown:
Click Manage Categories to view or change current Element category assignments or to create new categories.
Click column heads to sort on locked/unlocked status, Name, Description, Category, or Element Type.
The lock icon  displays for locked Custom Elements.
The Description field contains convenient links to Layouts (display templates and render handlers) defined for the Element. Click the link to view or change rendering for this Element.
Depending on Element type, the Actions column displays a set or subset of the following options. You can copy and delete Custom Elements, but not Standard elements. You can optionally unlock imported Custom Elements.
The edit icon  displays context-sensitive menus for modifying your site's Elements. CommonSpot displays more options for Custom Elements than for Standard Elements. The option to add a render handler, as shown above, displays only for Elements supporting render handlers .

View Data - For Global or Local Custom Elements, displays a popup menu for viewing current Custom Element data, viewing or changing the record filter, or adding a new record of this type.
See Selecting Rendering Mode and Render Properties in the Elements Reference.
 Copy: For Custom Elements, creates a copy of the current Element. Does not display for CommonSpot "factory" Elements
 Delete: Click to change Element state. "Deleting" suppresses rendering of existing instances and disallows new instances, but does not remove Element data from the system. You can optionally reactivate "deleted" Elements. Does not display for CommonSpot factory Elements.
 Add New Element: Click to create a New Custom Element for your site.
 Import Custom Element opens the Administrators Reference for Administrators Reference.
 View Usage displays the Element Usage dialog for viewing the location of all Elements in use at your site.
 CommonSpot includes the Export to Excel option in multiple reports throughout the system so you can conveniently collect and distribute data for import into spreadsheets or other applications that accept comma-separated values. Click this option to display a table of all fields within the current report, then select the fields whose values you want to export and save in spreadsheet or CSV format. Selected fields automatically display as column heads in the CSV output. You also have the option to change column names on the fly to customize your reports.
Related Links
You can download PDF versions of the Content Contributor's, Administrator's, and Elements Reference documents from the support section of paperthin.com (requires login).
For technical support:
