Explore the History of Cabrillo’s Base End StationDiscover the vital role Cabrillo's WWII-era Base End Station played in coastal defense through this detailed photographic tour. Perched along California’s coastline, the bunker served as a critical observation and command center, protecting U.S. shores from enemy threats. Soldiers stationed here used cutting-edge technology, like the M1910A1 azimuth scope, to gather and relay targeting data for artillery fire against enemy ships. From communication systems to the bunkroom where soldiers lived, each photo offers a unique glimpse into their lives and duties at Cabrillo National Monument. A Key Part of San Diego’s Harbor DefensesDuring WWII, Cabrillo’s Base End Station was part of the broader Harbor Defenses of San Diego, built to safeguard the Pacific Coast from potential attacks. Using advanced technology of the time, soldiers tracked ships and coordinated artillery fire to ensure the coastline remained secure. This bunker was just one part of a vast network designed to collect and process targeting data for artillery units stationed throughout the area. Despite the harsh conditions and confined spaces, these soldiers played a crucial role in preventing enemy vessels from reaching U.S. shores. 
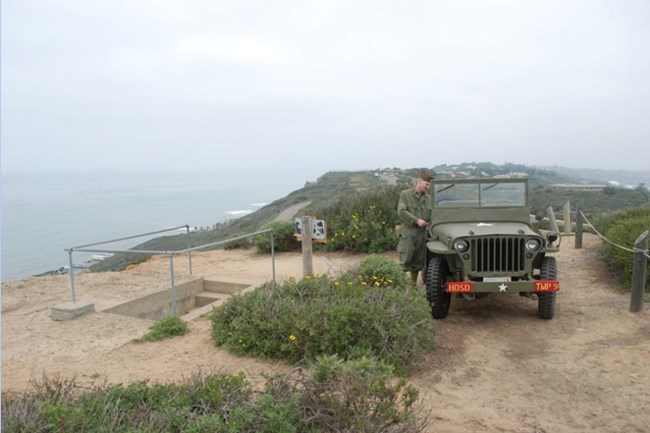
NPS photo. Entrance to the Base End Station and Battery Ashburn in the DistanceThis photo captures the entry to the Base End Station, looking north with the strategic vantage point of Battery Ashburn visible atop the distant hill. During WWII, this facility played dual roles—serving as the commander's office and as an observation post vital for gathering targeting data to accurately position coastal defense artillery. The vintage military jeep and historical reenactor add authenticity to the scene, bringing the past to life against the dramatic backdrop of the Pacific coastline. 
NPS photo Southward View of the Bunker Entry and Whale Watching StationThis image captures the southward entry to the Base End Station, with the whale-watching station visible just above the jeep's windshield in the background. Uniquely, this bunker is equipped with a staircase, unlike others in the park that require access through a ceiling hatch and ladder. The jeep, owned by Dan Sutton, is marked with insignia representing the Harbor Defenses of San Diego, connecting it to the site's historical military presence during WWII.
NPS photo Inside the Bunker - Communication Hub for Battery AshburnThis photo shows the interior of the bunker, looking southeast toward the door at the base of the stairs. The lockbox secures the phone used by the battery commander to issue fire commands to Battery Ashburn. Other phones in the room allowed communication with the lower bunker and various other locations. These communication tools were essential for coordinating artillery operations and ensuring the accuracy of coastal defense strategies during WWII. 
NPS photo. Battery Commander's Assistant Desk and Azimuth ScopeThis image shows a view slightly to the right of the previous scene, highlighting the desk used by the battery commander's assistant. Here, crucial tasks such as plotting and relaying orders were handled to ensure effective communication between the command post and artillery units. The M1910A1 azimuth scope, visible in the image, was a key tool for calculating precise angles for targeting. The combination of this equipment allowed the crew to maintain accuracy in coastal defense operations during WWII, ensuring quick and reliable coordination.
NPS photo. Restored M1910A1 Azimuth Scope on Original PedestalThis M1910A1 azimuth scope, mounted on its original restored pedestal, served as a crucial instrument in the park's coastal defense efforts during WWII. The pedestal was recovered from another bunker within the park and carefully returned to its original position here. With a magnification power rated at 15x—double that of standard binoculars—this scope allowed observers to detect and track distant enemy vessels with precision. It played a pivotal role in gathering targeting data to ensure accurate artillery fire from the surrounding defenses.
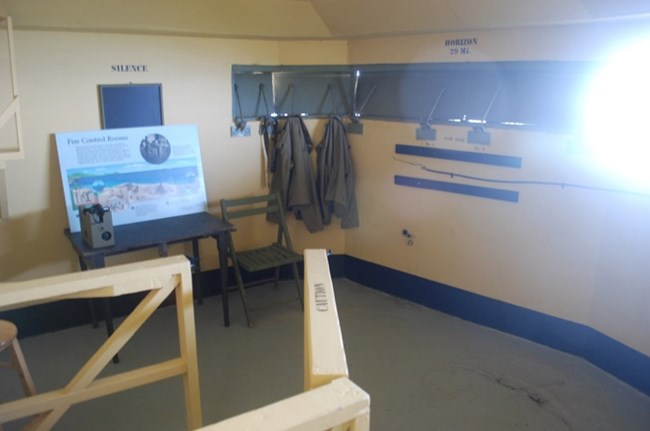
NPS photo Essential Instruments on the Northwest WallThis view of the northwest wall showcases two of the most crucial instruments in the bunker: the M1910A1 azimuth scope and the telephones. These tools were vital for tracking and coordinating artillery fire, making them central to the bunker’s operations. The ship identification chart, one of two reproductions created by a volunteer, was used to assist soldiers in quickly identifying potential enemy ships. These elements illustrate the precision and coordination required for successful coastal defense during WWII.
NPS photo Ladder Access to the Bunkroom: Restored Gate and RailingsThis view looks down the ladder leading to the lower bunkroom. A hatch can be placed over the opening to seal it off when necessary. Both the gate and the railings are reproductions, carefully designed based on original blueprints and surviving railings found in the lower level. The reproduction railings have been installed using the original holes in the concrete, where the original woodwork was once mounted. These details ensure historical accuracy while preserving the integrity of the restoration.
NPS photo Bunkroom at the Base of the Ladder: WWII Surplus Beds and Restoration DetailsThis image looks northeast, focusing on the bunkroom at the base of the ladder. The single light visible here is the only electric light installed in the entire bunker. The metal-framed beds, vintage WWII era, were obtained as surplus from a Boy Scout camp during restoration. Black paint along the wall and floor was applied to hide scuff marks left by soldiers' boots, particularly near high-traffic areas like the ladder. These details reflect the practical nature of the space and efforts to preserve historical accuracy during restoration.
NPS photo Bunkroom Southeast View: Camouflage Support PolesThis photo, looking southeast, captures the remaining bunk beds in the lower bunker. The metal poles on the floor were used to support camouflage netting when installed over the bunker’s entrance, ensuring the station remained concealed from enemy forces. The minimalist design of the bunkroom provided soldiers with basic sleeping arrangements while maintaining a strategic, low-profile presence during WWII operations. The room highlights the balance between functionality and concealment in coastal defense strategy.
NPS photo Bunkroom View Toward Lower Bunker AccessThis view, looking northwest from inside the bunkroom, shows the doorway leading to the lower bunker. At night, the door was kept closed to prevent any light from the bunkroom from being visible through the view ports in the lower bunker. This precaution was crucial for maintaining concealment during WWII operations. The bunkroom and lower bunker were designed for both functionality and safety, ensuring that observation duties and living quarters could coexist without compromising security.
NPS photo Restored Stairwell Gate at the Bunker’s Upper LevelThis image looks northeast, showcasing the top of the stairs seen in the previous photo. The original side railings are still intact, while the gate itself has been carefully reproduced as part of the bunker’s restoration. Remarkably, the original hinges and gate latch were found in place when restoration efforts began, confirming that the gate was part of the original WWII-era design. This attention to historical accuracy ensures that the bunker maintains its authenticity while providing modern visitors a safe, engaging experience.
NPS photo Lower Bunker Optical Instruments: Southwest ViewThis view, looking southwest, shows the area where two of the three critical optical instruments were originally installed on this level. The lower bunker housed two azimuth scopes and a depression finder, all of which played a crucial role in the coastal defense system. As the base end station, this lower bunker was responsible for tracking enemy targets and generating the triangulation data necessary to direct artillery fire. This space represents the heart of the observation and targeting process during WWII operations.
NPS photo Ongoing Restoration in the Lower Bunker: Northwest ViewThis view, looking northwest inside the lower bunker, reveals the only operational view port shutters, as the rest are rusted or welded shut. The M1918 azimuth scope in the photo is positioned close to where an original azimuth pedestal once stood, offering an authentic glimpse into the bunker’s past functionality. Unlike the upper level, restoration efforts for this lower area are still in progress, with more work needed to fully restore the room to its original state as a key observation point in WWII coastal defense.
NPS photo. Marks of History: Floor of the Lower BunkerThis image shows the floor of the lower bunker, with visible scars marking where key observation equipment was once mounted. The smaller marks on the left and right indicate the positions of azimuth scope pedestals, identical to those seen earlier in the bunker. The larger scar in the center represents where a depression finder was installed, mounted on a hexagonal cement base about 18 inches high. These devices were essential for calculating targeting angles and distances, playing a critical role in the coordination of coastal defense during WWII.
NPS Photo Tracking Targets Through the Fog: Amphibious Assault Ship ManeuversThis image illustrates why the Army supplied posters with ship silhouettes for target identification. The photo shows a Navy amphibious assault ship, located 6 miles off Point Loma, engaged in maneuvers. Seen through the M1910A1 azimuth scope, the fog obscures the ship’s details, emphasizing the need for simplified silhouettes in training. The scope’s scale was used to measure the distance between the target and the splash of a missed shell, helping soldiers adjust their fire for greater accuracy. |
Last updated: September 12, 2024
