Last updated: November 2, 2022
Article
Of Adobe, Lime, and Cement: The Preservation History of the San José de Tumacácori Mission Church (Part II - Structures)
Introduction
This is the second of a multi-part series that outlines the preservation history of the mission complex at Tumacácori National Historic Park. The first part of this report provides historical background and focuses on methodologies and experiments to preserve specific types of fabric and features of the mission complex. The third part describes research into the history of the church's gardens.
The NPS has faced a number of challenges over the years in conserving and protecting adobe and other fabrics used in the construction of the mission, and challenges to maintaining the architectural elements of the building. The successes and failures of preservation approaches are part of the preservation history. Several times, removing effects of earlier preservation efforts has resulted in unanticipated discoveries of details left by the original builders, such as hand and foot holds left in the dome of the nave, or traces of an earlier choir loft. This second part recounts efforts made to preserve specific parts of the mission.
Restoration of Structural Elements of the Tumacácori Church
Nave
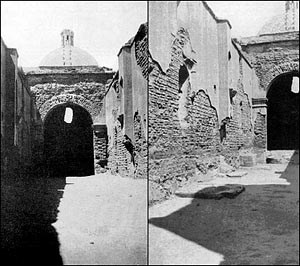
This was not a systematic archeological investigation and Noon did not screen the dirt for artifacts. There is no documentation of Noon’s excavations, therefore we know little about the archeology of the nave. Noon’s excavation is an example of how the archeology of Tumacácori has been motivated by preservation/restoration activities.
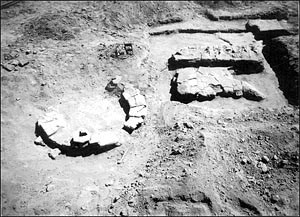
At Tumacácori, archeological work often preceeds preservation treatment. In the past, archeological sites or features were impacted or removed during preservation treatments. Work done in 1970 to lessen moisture retention in the east wall of the nave is an example of preservation treatments that did not adequately consider the effect on buried archeological resources. In 1970, plastic PVC sheeting was placed along the base of the nave walls in an attempt at directing subsurface moisture away from the structure. During placement of the plastic sheeting archeological features first identified by Paul Beaubien in 1934 were re-excavated, photographed, and completely removed.1 The features, located near the east wall of the nave between the sacristy and the bell tower, are within a convento work area designated Area 37a.
Nave Roof
Pinkley’s first major task at Tumacácori was to re-roof the nave to preserve the interior. There were no photographs or drawings of the original church roof, so he had to use remaining architectural evidence and knowledge of local craftsmanship. The first phase began with the rebuilding of the upper portions of the nave walls with adobe bricks. Pinkley manufactured many of the bricks used during restoration. One of the most difficult bricks to manufacture was the cornice brick. These challenges honed Pinkley’s knowledge of Tumacácori building materials and techniques.
At first, Pinkley was unsure about the type of wood used in the original roof. The original roof beams were probably re-used in an 1860s ranch house built either by the Lowe or the King family. The building was torn down and burned during railroad construction. Seventy years after removal from the mission, Noon recovered the “recently” burned end of a beam near the railroad. He identified the wood as pine and believed that the beam was from the church due to “the approximate size of the rafters [original beam], and, by measuring the partially burnt ashes on the ground, to get its length, which checked with the width of the nave of the church.”2 Pinkley now knew he needed large pines. Twenty-six pine trees measuring 18.5 feet long, with an average diameter of about 14 inches, were hauled 25 miles from the Santa Rita Mountains and squared with an adze.
Pinkley devised scaffolding and a tackle method for getting the huge beams up and over the nave walls without damaging the church or workers. When the beams were finally placed, he coated them with crude oil diluted with kerosene to make them look old. Once the primary beams were secured, dried ocotillo stems were laid across and topped with grass, mud, and lime plaster. Cement was added to the lime plaster, as the crew had difficulty making the lime strong enough. Rafters and roof boards were then placed, and the space between rafters filled with straw.
Pinkley completed the first roof reconstruction in 1921. After 1921, work on the roof consisted of the repair of a major leak in 1944 and total roof replacement in 1947 and 1980. Documented partial roof replacements occurred in 1978, 1990, and 1998. Partial replacements consisted of waterproofing or repairing the top of the roof. Since Pinkley’s reconstruction, different types of synthetic materials have been used to waterproof and seal the roof.
The Church Floor
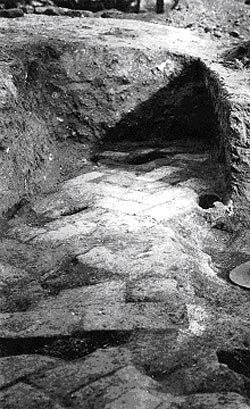
Letters between Pinkley and Noon suggest that the original church floor was hard packed adobe covered in six inches of lime plaster, but it was in bad condition when Noon investigated in 1919.3 Remnants of the floor plaster show that the floor had a distinctive red burnished surface, but it was not made of fired adobe brick. The present brick floor, in a basket weave pattern, was laid in 1939. This pattern is based on the remains of convento floors uncovered during Paul Beaubien’s excavations in 1934-1935. The steps leading from the nave to the sanctuary were restored in 1921. In 1957, the bricks of the present floor were sealed with Duocrex, resulting in a glossy but damage-resistant church floor. This was done to slow visitor impacts to the floor.
The Church DoorsAfter clearing the floor, Noon hung the church doors . He wrote to Pinkley that he was “having the doors and window [baptistery] made at Roy & Titcomb’s [in Nogales] and when finished will go back and put them in place.”4 It is unclear how the design was chosen, but it may have been based on San Xavier del Bac. The present church doors were installed in 1973. They were made by Rene Menard of Nogales and designed after the front doors at San Ignacio, Sonora.5 The 1919 doors are stored at the NPS Western Archeological and Conservation Center in Tucson as historic artifacts.
George Roskruge.
The Church Façade
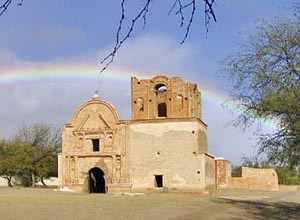
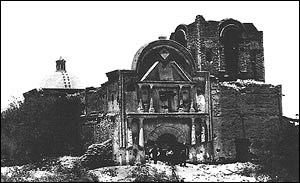
The façade is the south facing decorated church front. It has three parts: the lower face consisting of the columns, niches, and entrance arch; the second story columns, niches and window; and the pediment. The facade’s architectural style shows Spanish and Moorish influences, similar to other Kino missions.
Dale King reconstructed the lower columns of the façade in 1946. Originally, the whole façade was painted. According to Pinkley the background plaster was a “yellow tending towards pink.”6 The columns were red, with yellow capitals (top of column), and had some black markings of uncertain design that were barely visible in 1921. White bands on the façade columns give the appearance of solid stone construction. This treatment was also given to the top of the main entrance doorway, which is painted and incised to look like stone block. The four niches of the façade were painted blue and corbels extend from the niches, forming shelves for santos. The niche shelves have characteristic “spear-head” decorations that occur elsewhere in the church and throughout the Pimeria Alta.
The Façade Pediment
The façade pediment is the upper curved false front, which extends vertically approximately seven feet from the roofline. It makes the church appear larger and barrel-vaulted. The pediment seen today was rebuilt by Pinkley in 1921, out of fired adobe bricks, cement, and lime plaster. The original pediment probably fell in the 1890s. Pinkley reconstructed the pediment based on the Roskruge photos, taken in 1889, before the original pediment fell.
A ball holds a cross at the top center of the curved pediment. Noon recovered a fragment of the original ball on the pediment during excavation of the church floor in 1919 that was reused during restoration of the pediment. Pinkley painted the original half of the ball white. Today, the upper half of the ball is still painted white.
The Choir Loft
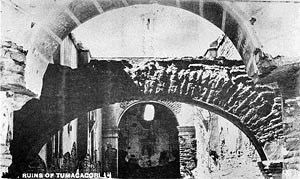
Photos of the church interior taken before 1893 show an intact choir loft. Based on available evidence, the choir loft fell sometime between 1892 and 1907. By circa 1905, the choir loft was no longer intact. Clemensen believes the choir loft fell in 1906.7 Tomas Alegria thought the choir loft collapsed in 1901, when the Montez family living at the mission hung a swing for their son from the arch.8 However, geologist William Blake visited the mission in 1905 and 1907, and notes from his 1907 visit suggest that the choir loft fell sometime between 1905 and 1907; presumably due to the combined impact of the 1887 earthquake and its use as a swing support.9
Evidence from architectural features on the interior of the east wall suggests that the choir loft in historic photos of the church was the second choir loft built. Tovrea and Pinkley found evidence of wall features from an earlier choir loft. The choir loft was half built by 1823, but was torn down and a smaller choir loft was constructed.10 Perhaps the first loft was structurally unsound or could not be completed as planned.
The Pulpit
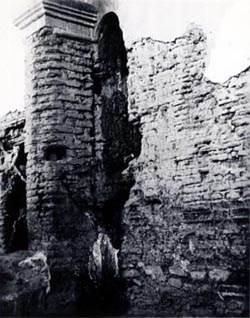
Noon uncovered remnants of the wooden frame of the pulpit when he excavated the church floor in 1919.11 Pinkley partially restored the pulpit between 1923 and 1924, based on the existing architectural evidence and on pulpits of churches in Sonora. All that was left of the pulpit at the time of restoration was a few marks in the wall plaster. The pulpit is only partially restored. In 1978, a plugged doorway was found during the removal of cement on the eastern wall. Chambers suggests that this doorway may have been the pulpit doorway before the church was modified from its original cruciform design.12
The Sanctuary
Preservation of the painted plasters in the sanctuary is a high priority, and has focused on painted plasters of the interior walls and dome. Most of the interior sanctuary plasters are original. Unfortunately, the sanctuary floor, walls, and altar have been targets for treasure hunters, who have damaged most of the original sanctuary features.13
Noon began work in the sanctuary in 1919. He plastered some exposed bricks and grouted eroded original plaster edges on the interior of the north wall. Noon also restored the main altar using sun-dried and fired adobe bricks. In 1921, Pinkley filled a large hole in the north sanctuary wall with adobe bricks where treasure hunters broke through in the area of a large statue niche. This hole is visible in many early photos of the sanctuary.
The sanctuary’s interior plaster was repaired sporadically from 1928 to 1949. Most of this work is undocumented, so there are few details. NPS employee Charles Steen and Harvard conservator J. Rutherford Gettens cleaned and stabilized plaster intermittently until 1952. After 1952, the next major project focusing on plaster preservation in the sanctuary began in 1972 and lasted until 1982.14 By 1982, plaster edges and holes were being patched with synthetic materials, including poly-vinyl acetate. Plasters were cleaned with ammonium carbonate. From 1982 to 2002, work on the plasters in the sanctuary interior continued, and today we are still working to slow plaster loss.
The Sanctuary Dome Interior
The sanctuary dome is one of the defining features of the church and was frequently described by early visitors to the mission.15 A lantern or cupola consisting of five columns capped by a dome sits atop the sanctuary dome. A cross is attached to the top of the lantern. The dome protects the sanctuary and creates an impressive space above the main altar.
In the past, the dome has frequently leaked. When water leaks into the dome interior through exterior cracks, the trapped moisture deteriorates the painted plaster, causing detachment and flaking. Once the interior becomes wet, it can take a long time to dry.
There are no documented repairs to the dome interior plaster before 1949. Plaster conservators from the U. S., Mexico, and Europe have worked to save the painted plasters.16 In 1982, a large-scale inter-disciplinary study of painted plaster erosion was initiated to determine preservation methods for stabilizing eroding the painted plasters.17 Loss was occurring at an alarming rate and park staff noticed the continual slow flaking of plaster. Conservation of the dome interior continued for almost 20 years, culminating in the completion of a large documentation and preservation project in 2002.
The Removal of the Northwest Pendentive Plaster of the Dome
The sanctuary dome is a pendentive dome. Pendentive domes enable the transfer of the total load of the dome to the four corners of the building, so that only the four corners need to be reinforced. Each of the four pendentives helps distribute the weight of the dome. Pendentives, and the painting of pendentives, go back to the 5th century B.C.18
All four of the pendentives supporting the sanctuary dome were etched and painted. Over the years, the plaster of the northwest pendentive eroded much faster than the other dome pendentives, primarily due to moisture seeping through the dome exterior plaster. In 1977, the etched and painted plaster from the northwest pendentive was removed to save it from irreparable damage. The plaster was removed by the NPS Western Archeological and Conservation Center and is currently stored at their facility in Tucson.19
The Sanctuary Dome Exterior
The first repairs to the dome exterior were completed by Pinkley in 1921. The dome, the dome lantern, and the upper moldings were heavily eroded. Pinkley repaired the dome apron moldings, the lantern columns and dome, replastered the dome, and placed a new cross on the lantern cupola. He placed the cross on the dome facing east-west, when the façade pediment cross faces north-south. Sometime after 1922, the dome cross was repositioned to face north-south, in the same direction as the pediment cross. Pinkley does not mention the techniques and materials used in the first dome repairs but he apparently used the same mixture of lime and Portland cement that he used on other areas of the mission. Pinkley mixed cement with lime because it was more durable than plain lime.
After Pinkley’s work in 1921, only minor repairs were made to the dome and lantern. In 1961, Roland Richert of the Ruins Stabilization Unit began work on the eroded dome exterior. The dome had several different types of eroded plasters and the lantern was crumbling. Richert scraped all loose plaster off and removed the modern cement patches to reveal the underlying lime mortar base.20 The dome was then painted with a mixture of Daraweld and water and deeper holes filled with bonding cement. Daraweld is an acrylic polymer bonding agent still in use at other parks. The bonding cement was a mixture of Trinity white water-proof cement, sand, Daraweld (acrylic-polymer bonding agent), and water. The entire dome and apron was covered with an eighth-inch coating of bonding cement. After 1961, numerous coats of cement bonding paints and latex paints were used to seal hairline cracks in the dome exterior plaster. These coats added weight to the dome and trapped moisture, increasing the erosion of interior plasters.
During work on the dome, Richert noticed that the lantern is positioned slightly off center, 6 to 8 inches to the north of the dome’s apex. Richert hypothesizes that “perhaps the twelve steps leading up the south side of the dome, and the slightly offset lantern, in addition to serving the practical purpose of reaching the feature more easily for making repairs, were so placed to achieve better esthetic balance, i.e., such placement had the artistic effect of breaking the monotonous line of the dome.”21
The next major project on the dome took place in 1979.22 The deterioration and removal of the pendentive plaster in 1977 was the first indication of moisture problems inside the dome. All previous stabilization materials were stripped from the dome exterior down to fired adobe bricks. Once the underlying fired adobe bricks were exposed, voids were filled and the surface was covered with 2 to 2.5 inches of lime plaster. After plastering, two coats of lime white wash were applied. The white wash consisted of 8 gallons of lime paste mixed with 10 gallons of water, mixed with 12 pounds of table salt and 6 ounces of powdered alum in 4 ounces of hot water. After 30 minutes, 1 quart of molasses and 12 ounces of formaldehyde were mixed into the salt and alum mixture. The mix was then added to the lime and water mix. This was a unique mix for white wash, and five years later the white wash turned yellow.23
During the 1979 dome work, cement on the dome apron was removed, exposing deep cracks in the fired adobe bricks near the base of the dome. Weathered bricks were removed to a depth of 1 foot on the north, south, and west sides of the dome apron. Cracks were filled with lime mortar and burnt adobe brick pieces and the areas between the base of the dome and apron edge filled with fired adobe bricks laid in lime mortar. The dome apron was given two coats of lime plaster and the western sanctuary canale repaired.
Tumacácori received higher than normal rainfall in 1983 and 1984. By spring 1983, the dome was leaking badly. At one point, the water was literally running through a major crack in the southern portion of the dome. Historic architect Tony Crosby inspected the mission in April 1984, and suggested a major evaluation of damage to the interior plasters. Conservator Paul Swartzbaum of ICCROM was contacted for assistance. Swartzbaum suggested that the white wash being applied to the dome be burnished rather than just brushed onto the surface and a silicon sealer should be sprayed over the dome after burnishing. The NPS Regional Office did not approve the silicone spray, since it would trap moisture in the dome. Staff then tried burnishing the white wash with table spoons, but the dome continued to leak and interior plasters eroded at an alarming rate.24
Finally, in 1985, the dome was coated with lime plaster and painted with four coats of a vinyl-acrylic-latex exterior masonry paint called Vin-L-Tex. The application of the paint was supposed to be a temporary measure, but it seemed to work, so it was continued until 1989. The dome appeared to be shedding water, but the interior never dried after the large leak in 1983. The trapped moisture was still degrading the painted interior plasters. In addition, 12 pounds of table salt in the white wash accelerated plaster erosion, and may have caused the loss of painted plaster.
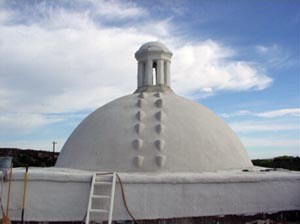
Work on the dome exterior was sporadic until 2004, when David Yubeta completed the most recent major repairs. Cracks had formed in the exterior plaster, and the bright white color of the dome was historically inaccurate. The first step was to remove the thick layer of paint and old plaster down to the brick substrate. Historic hand and toe-holds were discovered after the removal of over 2.6 tons of latex paint and eroded plaster. The hand and toe-holds begin at the base of the dome and continue to the top. They were built into the design for easier access to the top of the dome during construction and plastering of the exterior. Removal of old plaster also revealed that trapezoid-shaped bricks were laid flat in a circular manner to form the dome shape. The steps to the lantern are made from diamond-shaped bricks, some of which were replaced by Pinkley.25
Once the old stabilization plasters/paints were removed, the dome was sprayed with lime water, which made the dome better able to accept lime plaster. Next, St. Astiers Natural Hydraulic Lime (NHL 5), imported from France, was applied. Hydraulic lime sets in water, but it also sets by absorbing CO2 from the air, therefore, it hardens or sets twice. Three plaster layers were applied over the fired adobe brick substrate. The final product is a more subdued grayish-white dome that is historically accurate and consists of natural materials. The dome exterior is on a 3-5 year maintenance cycle.
Exterior Walls
The exterior of the church has undergone many repairs, and the appearance of the walls has changed over the decades. Early photos show that the walls still had holes for scaffolding used during construction of the church. Over the years, the original scaffolding holes were filled and plastered over to prevent moisture from entering the walls. In the 1960s, cracks were sealed with different colored grout and plaster, giving the exterior a jig-saw puzzle appearance.
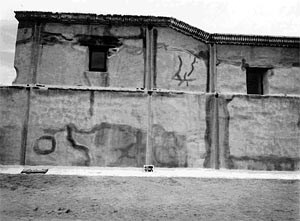
The exterior plaster of the west wall eroded at a quicker rate than other exterior walls and no original plaster exists on the west wall exterior. The biggest problem effecting plaster on the east wall exterior has been moisture entering through cracks and erosion at the base of the wall.
The east wall exterior was first repaired in 1919, and again in 1921.26 Pinkley filled voids at the base of the wall in 1921 and repaired some exposed adobes in 1928. There is no documentation of repairs to the east wall exterior between 1928 and 1943. In 1972, a tinted lime plaster wash was applied over the whole wall to fix the polka-dot appearance caused by different colored preservation treatments and cement patches. During this time the plaster mix included Daraweld, mixed with coloring and cement. Several coats of Daraweld were applied over the years. Chambers (1981) found that non-historic cement patches averaged five inches thick at the base of the east wall due to sixty years of cement patching. In comparison, cement on the west wall exterior averaged only 1.5 inches thick. The cement was removed in 1978.
By 1951, Superintendent Earl Jackson, doubted that any portions of original plaster still existed in the church.27 However, recent cement plaster was actually covering original lime plaster in many places. When Chambers began removing large areas of non-historic cement from the exterior walls in 1977, he found a pinkish cement plaster overlying what remained of original lime plaster. While attempting to remove the cement, portions of original plaster were damaged, but new areas of original plaster were revealed.
Preservation Mishaps: Area 37a
In Area 37a., archeologist Paul Beaubien uncovered evidence for on-site production of the church bells in the form of two heating features he called the furnace and retort. A plaster mould resembling a bell was discovered near the heating features. Beaubien also found pieces of copper everywhere. In 1934, the floor of the circular furnace retort was “covered with a thin layer of copper which had solidified in place.”28 Fifty pounds of copper were collected, tested at the University of Arizona, and found to contain no silver.
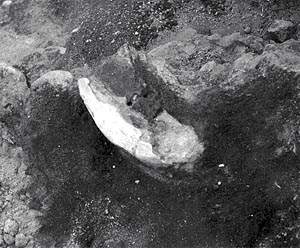
According to Beaubien, the features in Area 37a are the remains of a metal foundry; however, he was unsure that the plaster mould was for a bell. The idea that the mould was for a bell came from George Boundey who told Beaubien that he had found a plaster “core mould” of a bell that looked similar to the piece Beaubien found. Unfortunately, “while he [Boundey] was conducting some visitors through the mission, another party arrived and dropped a heavy rock on the object”.29
During re-excavation of the retort in 1970 a piece of burned adobe with impressions of ridges similar to those found on bells was found. Directly outside the retort was “a fragment of cast copper which looks like a bell fragment.”30 In 1971 a cache of copper and slag shelved in the storage room at Tumacácori labeled “Caywood’s bell moulds” was found. There were some copper fragments similar to those exhibited in the museum as bell fragments that were “found in a cave near Tumacácori.” Presumably, Caywood’s “bell moulds” came from Area 37a, near the heating feature Beaubien called the foundry.31
Are heating features, copper pieces, and moulds evidence that the bells were produced at the mission? Beaubien believed that the Franciscans would not have placed a foundry so close to the church. However, Mayer et al. (1971) make a strong argument that the features and artifacts are solid evidence that the Tumacácori bells were made on-site in Work Area 37a.32 Unfortunately, since the heating features were completely removed so that plastic sheeting could be laid, we cannot reassess their function or construction.
The four arches of the bell tower each had a bell. At least one of the original bells may have been made as early as 1809. When H. M. T. Powell visited the church in October 1849, he found three bells hanging in the tower and one inside the church.33 A bell lying inside the church was marked 1809 and was “dedicated to Señor San Antonio.”34 John Forsyth also noted that the bells bore the date of 1809.35 Daird Brainard, who followed Powell’s visit by one week, states that “three [of the bells] were still hanging, one had fallen down. Each had a different sound.”36 Benjamin Hayes also saw three hanging bells, and one fallen bell during his visit in December 1849, confirming the accounts of Powell and Brainard.37
The bells were hung in a stationary position and rung by a clapper attached to rope. Grooves in the bricks of the southern arch were left by the ropes attached to the clapper that struck the bells. Evidence in 1921 suggested to Pinkley that the largest bell hung from “a large oak beam” in the southern arch.38 The present bell tower arch beams appear to be original. Tree ring cores were drilled in 2005 with the hope of dating the four arch beams using dendrochronology. The beams were determined to be Arizona Oak, which cannot be dated using dendrochronology. The origin of the beams is unknown.
The church bells have not been recovered, but stories of their location are legends and myth. Pinkley recorded one such legend concerning the lost church bells:
Shortly after the abandonment of the mission the bells were buried by the Indian neophytes to prevent their destruction or removal….The bells were so heavy that their transfer south [to Mexico] would have been a problem…and I think the padres expected, when conditions grew more favorable, to return and re-establish the mission at Tumacácori. The legend was strengthened some years ago when a Mexican or Indian man turned up in Tucson with two bell clappers which he claimed belonged to the bells of Tumacácori. [The University of Arizona purchased the bells clappers and they are housed at the museum]. They [the bell clappers] had every appearance of being hand hammered and are crudely shaped. The man claimed that he had dug these up, knowing from the story which had been handed down through his family where they were buried.39
Despite speculation that the bells were buried for preservation, treasure hunters who thought they were made of gold and silver probably destroyed them. Of course, the bells were not made of gold or silver. They were probably made of a mixture of copper, iron and tin.40 However, the details of bell production at Tumacácori are obscured by the removal of the furnace and retort.
By Jeremy Moss
Acknowledgements
I would like to thank David Yubeta, and Superintendents Ann Rasor and Lisa Carrico for their support during this project. Special thanks goes to Karen Mudar for her editorial advice and assistance. Most of all I thank Frank “Boss” Pinkley for his boundless energy and will to preserve America’s special places.
Notes/References Cited
Much of the information in this article comes from uncatalogued archives including unpublished reports, official correspondence, interviews, field notes, and historic photographs.
1 Paul Beaubien,“Excavations at Tumacácori, 1934”, pp. 183-220, Southwestern Monuments Special Report No. 15, (March 1937). Louis Caywood, 1964 Archeological Excavations at Tumacácori National Monument, Arizona. WACC, Tucson.
2 George Chambers, Tumacácori Preservation Project: Field Activities 1977, 1978 and 1979. Division of Adobe and Stone Conservation, WACC, Tucson, 1981.
3 George Boundey (Custodian), Southwestern Monuments Reports, September 1934 (report for August).
4 Ranger Dubois, letter dated May 1907.
5 Letter from Frank Pinkley to Director Stephen Mather, Dec. 17, 1918, pg. 7. WACC Archives, Tucson.
6 SCharles R Steen and Rutherford J. Gettens, Tumacácori Interior Decorations. pg. 16. National Park Service, 1949. Tumacácori Interior Decorations and Report on Inspection and Recommendations for Treatment of Plaster Walls and Wall Paintings. Arizonian 3:7-33, 1962.
7 Steen and Gettens 1962, pp. 30-31.
8 Timothy Lewis and Matilde Rubio, Study of Materials Present in Twenty One Micro Samples Taken from the Painted Murals at Tumacácori Mission, 2002. Manuscript on file at TUMA.
9 Steen and Gettens 1962, pg. 31.
10 Frank Pinkley and J. H. Tovrea (1936). Jake Ivey, Historic Structure Report: Tumacácori, Calabasas, and Guevavi Units, Tumacácori NHP (Final Draft 2007), Chapter 4. History Program, Intermountain Support Office, NPS, Santa Fe.
11 Letter from Noon to Pinkley, May 19th, 1919. WACC Archives, Tucson.
12 Chambers (1981).
13 Letter from Noon to Pinkley, May 19th, 1919. WACC Archives, Tucson. Pinkley (October 1936).
14 Martin Mayer, Tom Caperton, and Sam R. Henderson, Stabilization Report, 1971, Mission, Granary, and Convento. Ruins Stabilization Unit. WACC, Tucson. Crosby (1985).
15 J. Ross Browne, Adventures in Apache Country: A Tour Through Arizona and Sonora, with Notes on the Silver Mines of Nevada. Harper and Brothers, New York, New York, 1871. John R. Forsyth, Journal of a Trip from Peoria, Illinois to California on the Pacific in 1849, Peoria Public Library, Peoria, Illinois. The Ruins of San Xavier; Memories of the old churches of Southern Arizona. “The Most Ancient church on the Pacific Coast Now an Unsightly Ruin—Story of It’s Bulding—Its Art Treasures.” New York Times, March 1, 1891. William Wrightson, Second Annual report Santa Rita Mining Company. (March 19, 1860), pp. 14-15. Special Collections, University of Arizona Library, Tucson.
16 Tony Crosby, Historic Structure Report Tumacácori National Monument, Arizona, U. S. Department of the Interior, NPS, Denver 1985. Lewis and Rubio (2002). Melissa Markel, Dome Preservation Monitoring Documentation for Tumacácori NHP, WACC Project (TUMA 2004C), WACC, Tucson, 2004. Georgina A. Pearson and Edna San Miguel, San Jose de Tumacácori Mission Conservation Report, Tumacácori, Arizona. Manuscript on file at TUMA, 1994. Edna San Miguel-Siow, San Jose de Tumacácori Mission Conservation Report (Dome interior). Manuscript on file at TUMA,1993.
17 Crosby (1985).
18 Lyn Rodley, Byzantine Art and Architecture: An Introduction. Cambridge University Press, 1994. Robert G. Ousterhout, Master Builders of Byzantium. Princeton University Press, 1999.
19 Gloria Giffords, Removal of the Plaster and Painting from Northwest Pendentive of the Sanctuary of the Church at Tumacácori National Monument. Report on file at TUMA, 1977.
20 Roland Richert, Maintenance Stabilization, Tumacácori National Monument, pg. 21, NPS Southwest Archeological Center, Globe, 1961.
21 Roland Richert, Maintenance Stabilization, Tumacácori National Monument, pg. 21, NPS Southwest Archaeological Center, Globe, 1961.
22 Chambers (1981).
23 Chambers (1981).
24 “Tumacácori Mission Dome- Project Update”. WACC, Archives, Tucson, 1986. (unknown author; possibly by Tony Crosby)
25 Markel (2004), pp. 8-10.
26 Frank Pinkley, “Repair and Restoration of Tumacácori 1921” pg. 261, In Southwest Monuments Special Report No. 19, National Park Service, (October 1936).
27 Earl Jackson, Tumacácori Mission Stabilization Subsequent to July 1947 with Recommendations. (File No. 691), WACC Archives, Tucson, 1951.
28 Beaubien (1937), pg. 96.
29 Beaubien (1937), pg. 96.
30 Martin Mayer, Tom Caperton, and Sam R. Henderson, Stabilization Report, 1971, Mission, Granary, and Convento, pg. 25. Ruins Stabilization Unit. WACC, Tucson, 1971.
31 Mayer et al. 1971, pg. 33.
32 Mayer et. al. (1971).
33 Douglas S. Watson, The Santa Fe Trail to California, 1849-1852: The Journal and Drawings of H. M. T. Powell, pp. 141-142. The Book Club of California, San Francisco, 1931.
34 Watson (1931).
35 John R. Forsyth (1849), pg.74.
36 Daird Brainard, “Journal”, October 13, 1849, Bancroft Library, Berkley, California.
37 Benjamin Hayes (1931), Richard J. Hinton, The Hand Book to Arizona: It’s Resources, History, Towns, Mines, Ruins and Scenery, pg. 192, American News Company, 1878. (Second printing by Arizona Silhouettes, Tucson, 1954)
38 Pinkley (October 1936), pg. 275.
39 Pinkley (October 1936), pg. 275.
40 Charles W. Polzer, “Legends of Lost Missions and Mines”, Smoke Signals, No. 18, pg. 176, (Fall 1968).
