Last updated: July 2, 2025
Article
Conserve O Gram 16/6: Labeling Textiles in Museum Collections

This Conserve O Gram provides guidelines for creating Tyvek® labels and attaching them to textiles. Prior to becoming museum objects textiles are often labeled to indicate ownership, designer, maker or manufacturer, fiber content, and care specifications. These labels are sewn-in, adhered, embroidered, or directly inked into the textiles. Once a textile becomes part of a museum collection, it requires another label for use within the institution. In NPS collections, objects are labeled with their catalog number. The label must be legible, museum quality, and secured appropriately to the textile. This label technique requires an inkjet printer. The attachment methods described in this Conserve O Gram can be used with other label materials.
Choose label locations thoughtfully. A label must be secured to a sturdy area, ideally on the interior or reverse of the textile. The location should be invisible when the textile is exhibited, but easily accessible for collections management and inventory activities. Keep locations consistent across textile types when possible and record this information according to institutional protocol. Choose attachment method based on the structure of the textile to be labeled. Do not attempt to label textiles with little structural integrity, such as shattered silks or particularly fragmentary textiles. Instead, these textiles should have their labels securely attached to their storage housings or exhibit mounts.
Choose label locations thoughtfully. A label must be secured to a sturdy area, ideally on the interior or reverse of the textile. The location should be invisible when the textile is exhibited, but easily accessible for collections management and inventory activities. Keep locations consistent across textile types when possible and record this information according to institutional protocol. Choose attachment method based on the structure of the textile to be labeled. Do not attempt to label textiles with little structural integrity, such as shattered silks or particularly fragmentary textiles. Instead, these textiles should have their labels securely attached to their storage housings or exhibit mounts.
Materials
A computer, a word processing application, and an inkjet printer are required for creating these labels.
- Tyvek® 8 ½” x 11” sheets for desktop inkjet printers - per manufacturer’s specification, never use in laser printer
- Inkjet Printer
- Black inkjet printer cartridge (name brand) recommended by printer manufacturer
- Colorfast cotton or cotton/polyester thread of the appropriate weight and color to match textile
- Sewing needles of the appropriate size - the chosen needle should be able to pass through the textile’s elements without causing distortion, closely woven textiles will require a finer needle
- Straight or curved needles can be used - curved needles can be useful when access to both sides of the textile is limited, as with lined or layered textiles (quilts, lined clothing, and curtains, etc.)
- Small scissors for cutting labels and threads
- Any additional sewing tools based on personal preference such as a needle threader, thimble, or magnifier
When purchasing Tyvek® sheets, look for products that specifically state that they have been coated on one side for inkjet printing. The sheets should be white, opaque, and very smooth on one side.
Although the Tyvek® sheets are water resistant, conservators should remove Tyvek® labels before any wet treatment is carried out.
Label Preparation
- Type the catalog numbers using a word processing application in your preferred grid and font size.
- Feed or place the Tyvek® sheets into your printer’s tray so that the “paper-like” side of the sheet is the side that will be printed.
- Print document.
- Cut out the labels using small scissors and slightly round the corners to minimize snagging risk to the textile.
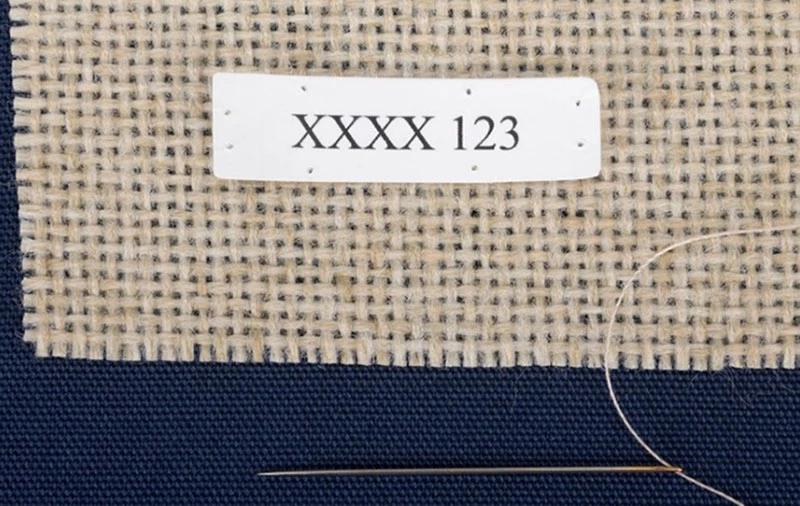
- Use a needle or pin to create stitch holes in the Tyvek® label prior to stitching to make it easier to obtain an even stitch placement. Usually, two to three stitches per side are adequate depending on label size.
- Determine an appropriate location to attach the label and choose thread and needle accordingly.
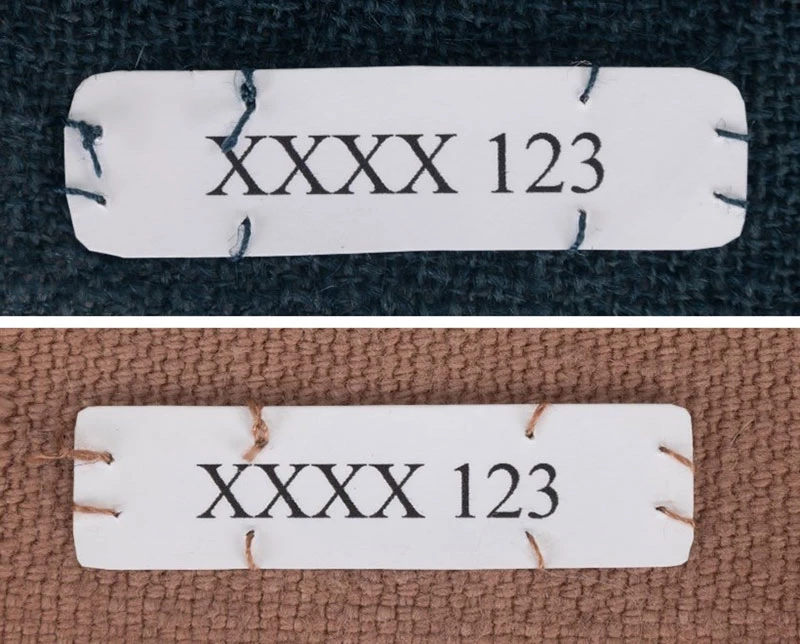
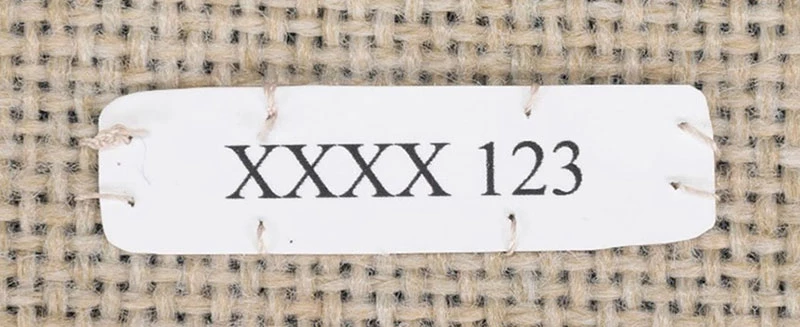
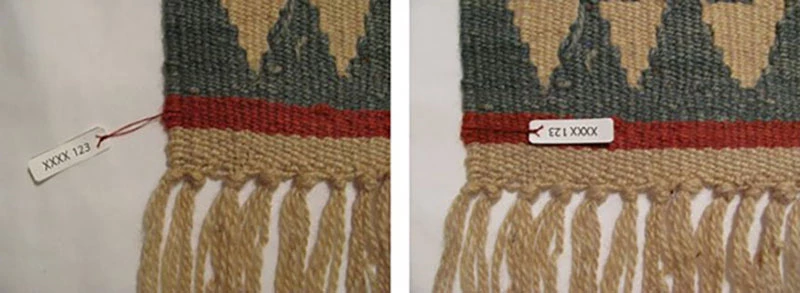
- The thread color should match the textile area to be labeled (Figure 2). This ensures that the label stitches do not become a visual distraction when the textile is viewed. Matching thread prevents the need to remove labels before display which reduces unnecessary handling.
- Estimate the length of thread required to stitch around the label.
- Choose an appropriate attachment method, either stitched or looped, based on the textile and possible exhibit requirements.
Stitched Labels
Stitching
Secure the ends of the sewing threads by tying a small knot in the end of the thread, back stitch or use half hitches on the label front, or alternatively leave a long tail at the beginning and tie the two thread ends together in a small square knot after stitching around the label. Make sure the knot rests against the top of the label, never directly against the textile surface.
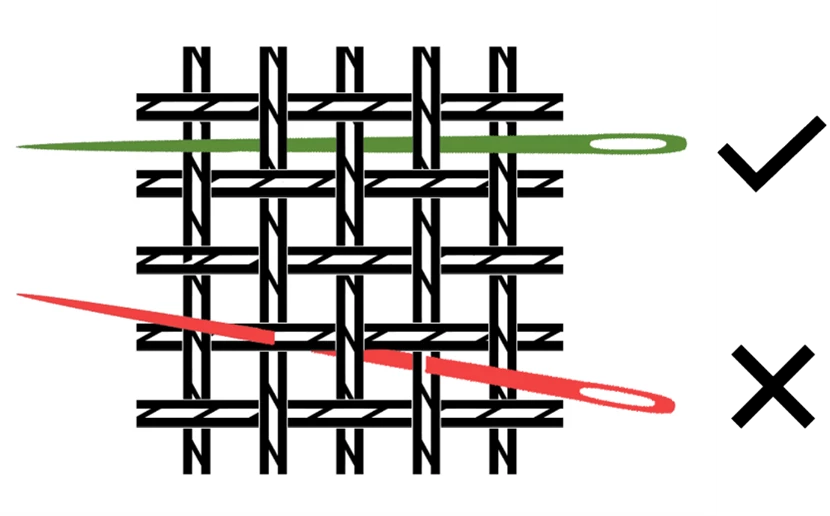
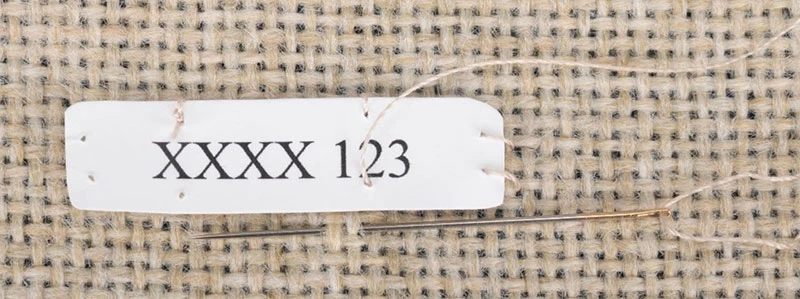
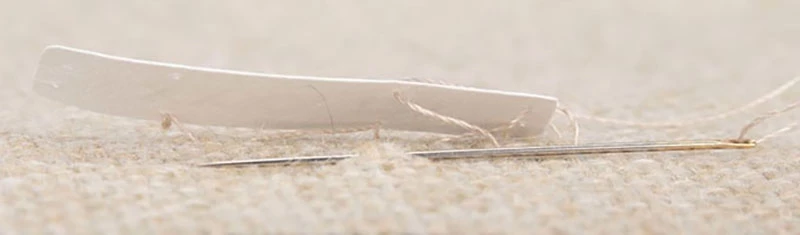
Hand stitch the label using the minimal number of stitches needed to secure it to the textile. Work the needle between elements of the textile’s structure to prevent splitting threads or yarns (Figure 3). Keep a moderate tension while stitching. If stitches are pulled too tightly, the textile’s elements could be damaged.
The following figures show one method.
- Secure the thread to the label using one of the above methods. This is depicted in the following diagrams as a small knot with a tail on the front of the label.
- Loop the thread around the edge of the label and bring the needle up through the hole.
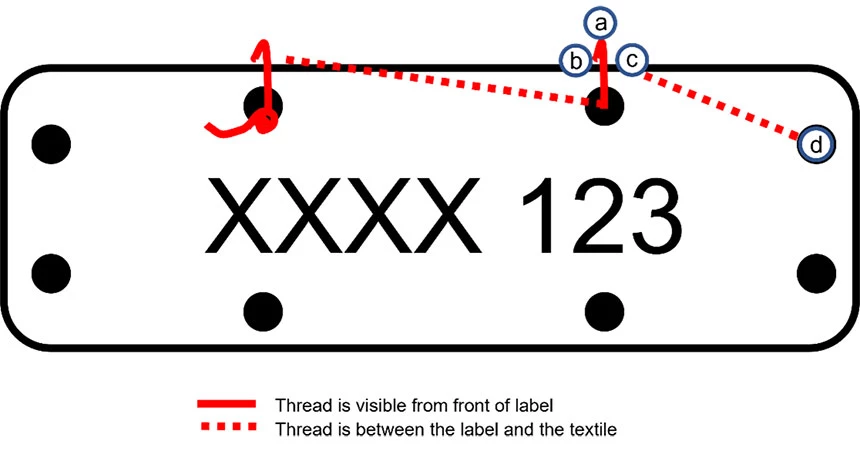
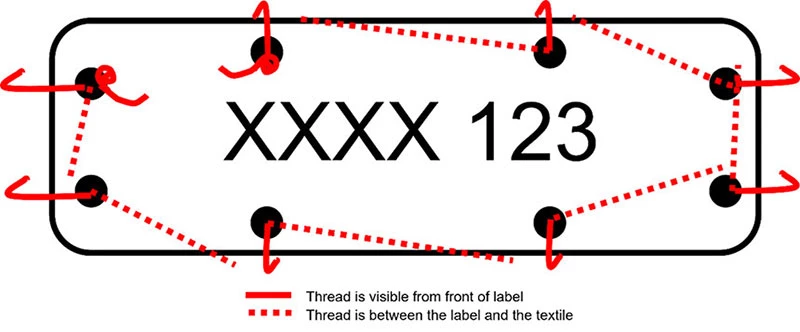
- Use the diagram in Figure 4 to create the first stitch.
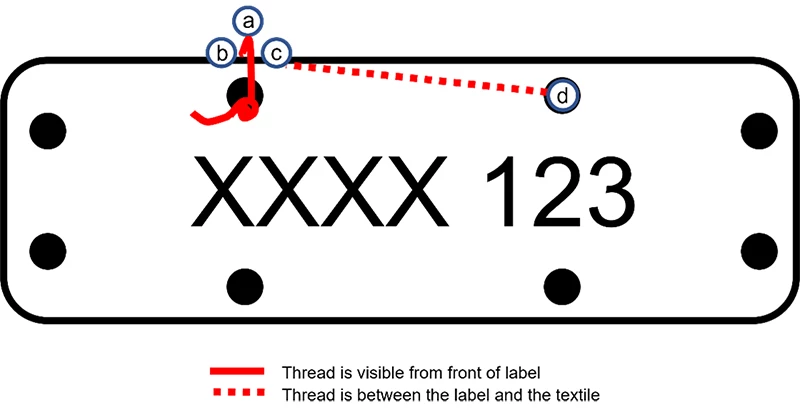
- Step a. Take the needle around the edge of the label.
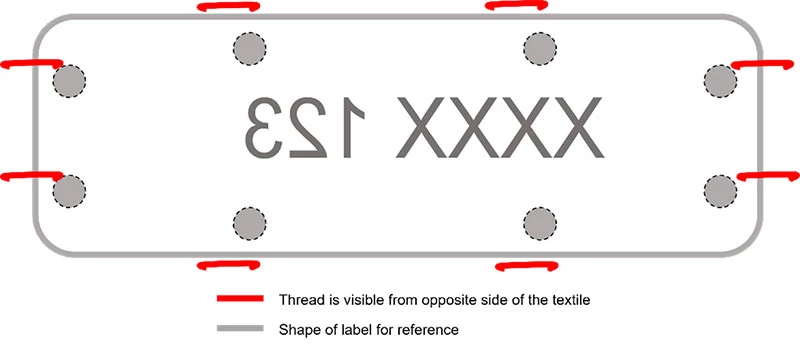
- Steps b. and c. Take a stitch through the object following the textile’s grain line. The needle will enter the textile at point b and come up at point c.
- Step d. Without taking another stitch, come up through the next label hole. Only the stitch (steps b-c) will show on the other side of the textile.
- Figure 5 uses the same numbered steps and shows how to complete the rest of the stitching around the label.
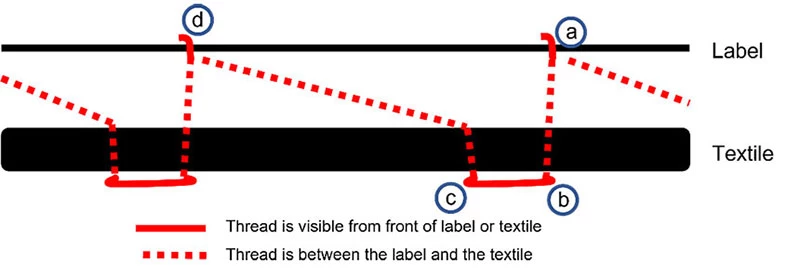
- Finish by securing sewing thread ends using one of the methods described above.
Looped Labels
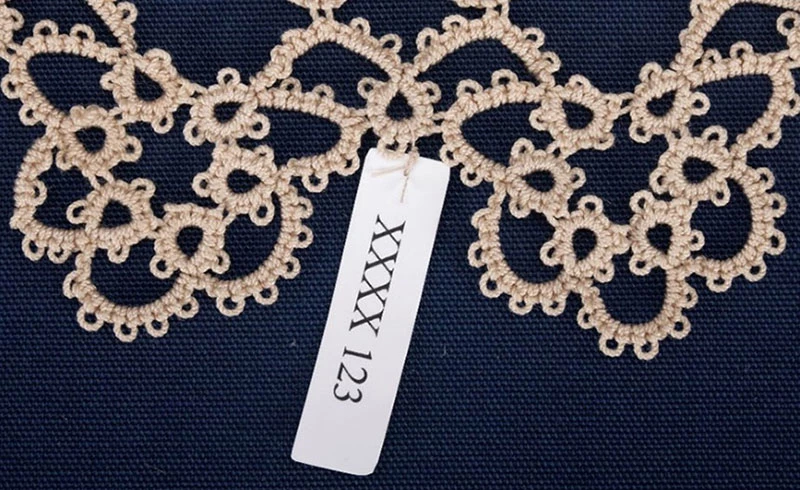
Looped labels allow the label to be positioned on either side of the textile and are useful for double sided textiles or textiles with an open structure, such as lace.
- Secure the ends of the sewing threads by tying a small knot in the end of the thread, back stitch or use half hitches on the label front, or alternatively leave a long tail at the beginning and tie the two thread ends together in a small square knot after looping the thread to the textile. Make sure the knot rests against the top of the label, never directly against the textile surface.
- Use a needle to loop the thread to the textile, choose a structurally sound area take the needle between or around stable textile elements (this could be a lace or other knotted or interlaced element, an existing hole, selvage cord, etc.).
- Secure the end of the thread to the label using one of the above methods.
- Leave enough slack or length in loop to enable the label to be positioned where desired.
Printed Tyvek labels are a legible, resilient, and time efficient option for identifying textiles in a museum collection. Using the methods described in this Conserve O Gram ensures that the labels and attachments are secure and appropriate. This methodology was developed at The George Washington University Museum and The Textile Museum, Washington D.C.
Anne Ennes
Textile Conservator
Museum Conservation and Collections
Harpers Ferry Center, National Park Service
Maeve O’Shea
Textile Conservation Specialist
Great Basin Institute Research Associate
Maggie L Walker National Historic Site
Museum Conservation and Collections
Harpers Ferry Center, National Park Service
Kyle Bryner
Conserve O Gram Coordinator and Editor
Museum Specialist and Collection Manager
Museum Conservation and Collections
Harpers Ferry Center, National Park Service
Published September 2023
The Conserve O Gram series is published as a reference on collections management and curatorial issues. Mention of a product, a manufacturer, or a supplier by name in this publication does not constitute an endorsement of that product or supplier by the National Park Service. Sources named are not all inclusive. It is suggested that readers also seek alternative product and vendor information in order to assess the full range of available supplies and equipment.
The series is available on the National Park Service Museum Management Program's website.