Last updated: August 14, 2018
Lesson Plan
Wright Flight

- Grade Level:
- Upper Elementary: Third Grade through Fifth Grade
- Subject:
- Math
- Lesson Duration:
- 60 Minutes
- State Standards:
- North Carolina State Standards
NC.4.MD.4 Represent and interpret data using whole numbers.
Collect data by asking a question that yields numerical data. - Additional Standards:
- North Carolina State Standards continued
Make a representation of data and interpret data in a frequency table, scaled bar graph, and/or line plot.
Determine whether a survey question will yield categorical or numerical data.
Essential Question
How does mathematics, trial and error, and determination lead to success, and help us reach our goals?
Objective
The student will be able to create a table and using critical thinking skills to solve word problems based on that data.
Background
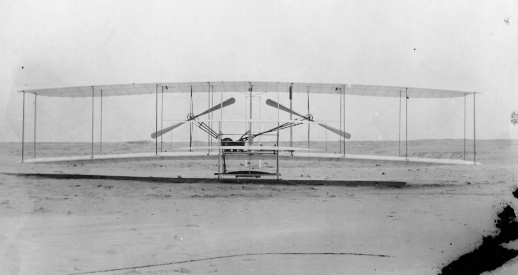
The achievements of the Wright brothers’ took perseverance and determination. Many times Orville and Wilbur made revisions and improvements to their design. Even in failed attempts they tried again. After much effort and trial and error they successfully completed the first powered flight on December 17, 1903 in Kitty Hawk, North Carolina.
Preparation
Pre-Visit:
Students should have previous knowledge of the Wright brothers and their attempted flights, revisions, and finally success. (See “Who Were the Wright Brothers” lesson plan link below) They should know that the Wright brothers had four successful flights on December 17, 1903. They should also know how to measure using a measuring tape.
Review of Using a Measuring Tape:
http://studyjams.scholastic.com/studyjams/jams/math/measurement/measure-length.htm
Materials
Students will need the following: Wright Flight Worksheet, Paper, Scissors, Tape, Pencil, Timer ,and Measuring Tape. For full lesson plan with worksheet click the lesson materials link below.
Procedure
1. Discuss the reason the Wright brothers chose this spot to fly their plane. Ask the students what they would be looking for if they were the Wright brothers. What would the characteristics of the place you were looking for have? The Wright brothers were looking for sand, wind, and seclusion. Why would they want these things? Discuss. Sand-for the landing so that they would have an easier landing. Wind-to help the glider stay aloft. Seclusion-So there would be less people watching their experiments.
2. Introduce the following terms and have them demonstrate with their hand.
• Roll- Roll allows the aircraft to tilt from side to side.
• Pitch-Pitch moves the nose up and down. Essential for takeoff
• Yaw-Yaw turns the plane left or right.
3. Review the 4 flights of December 17, 1903 and have students fill in the chart at the top of the worksheet.
• 1st flight- 12 seconds 120ft
• 2nd flight- 12 seconds 175 ft
• 3rd flight- 15 seconds 200ft
• 4th flight- 59 seconds 852ft
4. Explain that the Wright brothers studied many different glider wings and even bird wings when designing their gliders and flyers. They tried many different designs and continued to make modifications until they were successful. Today each student is going to make their perfect airplane! Pass out paper, tape and scissors. Students will be given 5 minutes to make their perfect plane.
5. After they are finished, point out that Wilbur and Orville put their flyer on a dolly (because their plane had no wheels) and they slid it down a rail before liftoff. Today each student will run their plane 40 feet (show the markings or mark out 40ft) and then launch their plane. They will have a partner who will time how long their plane is in flight. Remind them not to start the timer until the plane comes out of their partner’s hand. After the plane lands the timer stops and the data is recorded. They will then measure, with a measuring tape, the length the plane flew and record. After each partner has gone twice, they have the option to make an adjustment to their plane, just as the Wright brothers often did. Then the students will fly their plane the last 2 times.
6. After flying 4 times the students will sit and complete the questions using the charts they have made.
7. Once all students have finished, go over the results. The results will vary because of differences in the planes. Discuss why some may have flown further and longer. If there is one plane that went significantly longer look at the plane. Is it different in any way? What about the shape of the wings? When students made adjustments to their plane did it go further and fly longer? What kind of adjustments did you make?
8. After completing the activity, tell the students that Wilbur and Orville actually found that longer, narrower wings that curved flew longer. Also a lighter plane flies further than a heavier plane. Did we find this to be true? Discuss.
Vocabulary
Data - Facts and statistics collected together for reference or analysis.
Assessment Materials
Evaluation Rubric/Concluding Questions:Students will be assessed based on their data and concluding questions that they answer based on that data.
Enrichment Activities
Now that students have more information about what worked better and hints have been given on design have them recreate a glider using materials from home. Have them conduct the same experiment again to see if their new and improved glider flew better than their first paper glider. Video your glider flying. Show us the time and length.
Additional Resources
Websites:
What Makes Paper Airplanes Fly?
https://www.scholastic.com/teachers/articles/teaching-content/what-makes-paper-airplanes-fly/
Using a Measuring Tape http://studyjams.scholastic.com/studyjams/jams/math/measurement/measure-length.htm
Books:
First Flight by Caren Jenner
