Article

Virtual Junior Ranger Summer Camp: Day 3—Kick Start to Summer

Youth participating in a creative activity using post-consumer materials.
Youth getting creative by repurposing food packaging for a Canal Activity.

NPS Photo / C&O Canal NHP

Upcycling Activities

Get creative and repurpose items you can find around your house! Upcylcing is similar to recycling, except instead of tossing recylclable items into the blue bin, you find a new purpose for them.

Got plastic water bottles, newspaper, or cereal boxes collecting in your recycling bin? Flex your creativity skills and repurpose items lying around your house with these fun activities!

Create your own water bottle bubble wand, make a DIY Hummingbird feeder, build a newspaper fort, and create your nature crown for your new castle! Your imagination is the only limit. Make sure to find an adult to help you get started.

Connect with us on social media and share your summer camp adventure by using the hashtags #CanalKidsVJR or #CanalKidActivities.
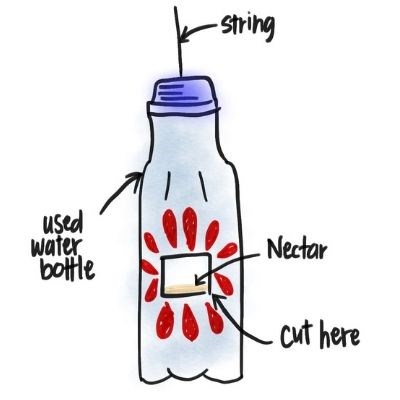
Illustration of a do-it-yourself hummingbird feeder.
Diagram illustration of a DIY hummingbird feeder.

NPS / Raisa Barrera

DIY Hummingbird Feeder

Build your own hummingbird feeder! Don't discard that empty plastic water bottle, instead follow the steps below to create a do-it-yourself hummingbird feeder.

Supplies needed—Clean and empty water bottle; string; sugar; water; scissors; markers

  1. Grab an adult to help you with this craft. Remove any label from the bottle and cut a hole about the size of your thumb 2 inches from the bottom.
  2. Have an adult help you boil 2 cups of water with ½ cup of white sugar. This will become the nectar to feed the hummingbirds!
  3. Decorate the outside of the bottle to look like a flower around the hole you cut in Step #1. Pro-tip: Hummingbirds like the color red, so if you make your flower red, you might be able to attract more hummingbirds!
  4. Once your nectar has cooled, carefully pour it into the bottle so that it fills up to the bottom of the hole.
  5. Tie a string around the neck of the bottle and hang in an area outside.
  6. Wait patiently and quietly to see if any hummingbirds stop by for a drink!

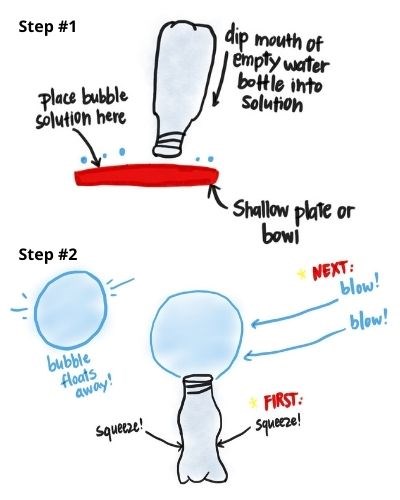
Diagram illustration of the do-it-yourself craft "Water Bottle Bubble Blower."
Diagram illustration of the do-it-yourself craft "Water Bottle Bubble Wand."

NPS / Raisa Barrera

Water Bottle Bubble Wand

Don't have a bubble wand or bubble solution? No worries—we've got just the craft for you. Check out the steps below to get started.

Supplies needed—(1) Empty water bottle, dish soap, water, shallow bowl or plate

  1. First make the bubble solution. Add about ¼ water to 1 table spoon dish soap in your shallow bowl or plate. Lightly mix the solution. Make sure to not over mix!
  2. Get creative! Use stickers, Sharpie markers, or colorful string to decorate and personalize your water bottle bubble blower.
  3. To blow the bubbles, dip the mouth opening (without the cap) of your water bottle bubble wand into the bubble solution. Remove and gently squeeze slowly. Make sure not to squeeze to quickly, or else your bubble may pop!
  4. You'll see a bubble start to grow bigger and bigger. Once you're ready...blow the bubble off your water bottle bubble wand. Watch your bubbles float into the atmosphere!
  5. Repeat and have fun! Have other sized containers lying around? Trying using a 2-liter soda bottle and see how big you can make your bubble grow.
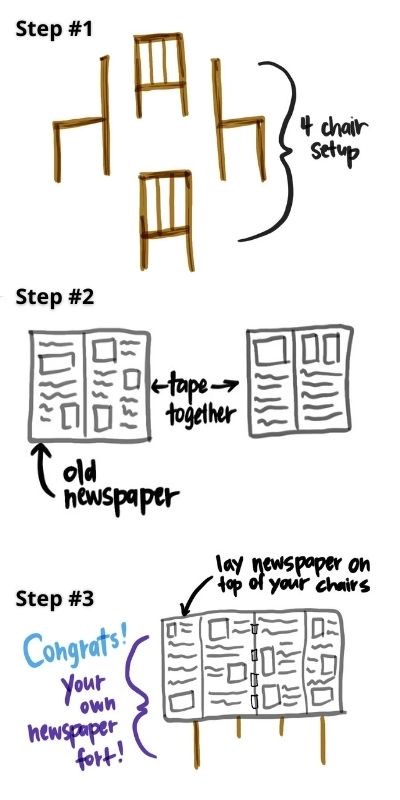
Diagram illustration of steps to making a do-it-yourself newspaper fort.
Steps to making your own at-home newspaper fort.

NPS / Raisa Barrera

Newspaper Fort Building

Beat the heat! Have some fun using your imagination and build a newspaper fort indoors. With the help from an adult, check out the steps below to get started. As you create your fort, get creative and build your own design.

Supplies needed—Chairs to build your fort around; Newspaper; Tape; Optional: String or twine

  1. Start off with 4 chairs set across from each other (see pictured left).
  2. Time to build the roof and walls! Find newspaper that otherwise would've been discarded. Tape the newspaper pages together to create panels. Tape at least 3-4 (or more) pages together.
  3. Double-check to make sure the newpaper panels are long enough to drape across the chairs. Drape panels across chairs and tape to secure.
  4. Keep repeating the process until you've create a roof and walls for your fort.
  5. Optional: With the help of an adult, tie string or twine across the chairs to create a more stable roof!

Extension—Get creative and change the design of your fort! How big can you make it? What shapes can you make? Bring a book under your fort and a flash light and enjoy your new reading den.

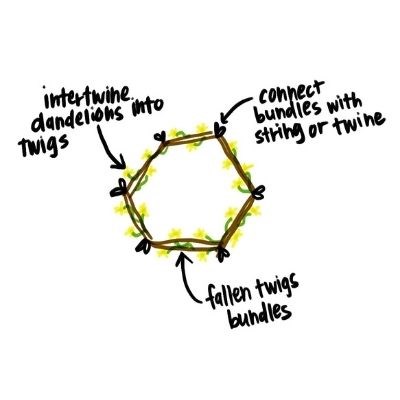
Diagram illustration of how to make your own nature crown.

DIY Nature Crowns

Has your parents ever asked you to help pull weeds in your yard or garden? Now you can help and instead of throwing away the dandelions, you can make your own nature crown! With the help of an adult, check out the steps below to get started.

Supplies needed—Twigs or branches, string, dandelions or fallen leaves

  1. Gather twigs and fallen branches around your yard.
  2. Gather fallen leaves. With the permission of an adult, gather weeds and dandelions from your yard.
  3. Arrange the twigs and branches into bundles. Tie bundles together using string to connect them into a crown shape. Try on your crown before decorating to make sure it fits! Adjust as necessary.
  4. Weave the dandelions, twigs, and leaves throughout your nature crown.
  5. Place on top of your head and use your imagination to rule your kingdom!
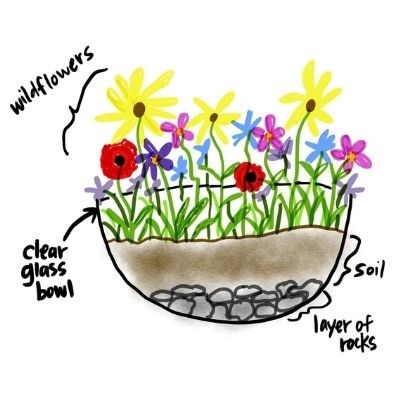
Digital illustration of a wildflower terrarium.

DIY Wildflower Terrariums

Want to build your own little ecosystem and watch it thrive? This activity takes patience and the excitement to watch things grow. With the help of an adult, check out the steps to get started below.

Supplies—A glass bowl or 2 liter soda bottle; wildflower seeds; rocks or pebbles; soil; water; tape

  1. Get your clear glass bowl. If you don't have a clear glass bowl, find an adult to help you cut a 2 liter soda bottle in half. Cover the cut edges with tape to make it less sharp.
  2. Fill your clear contained with about 1 inch of rock and pebbles.
  3. Place about 2 inches of soil on top of the rock and pebbles layer.
  4. Sprinkle your wildflower seeds on top. Place another thin layer of soil on top of seeds. Lightly water. Place your terrarium in an area that gets plenty of sun light.
  5. Water your seeds reguarly (seed wildflower seeds packet for directions on watering schedule) and observe your DIY Wildflower Terrarium over the next few weeks.
Extension—Create a Nature Journal and record your observations in a simple notebook. How long did it take for you to see your wildflowers sprout? What colors do you see? How many flowers did you observe after 3 weeks? What critters and bugs live and visit your terrarium?

Chesapeake & Ohio Canal National Historical Park

Last updated: July 7, 2021