Last updated: April 7, 2025
Article
Investigating the Visible Stains on the Stainless Steel Skin of the Gateway Arch
Wiss, Janney, Elstner Associates, Inc.
Introduction
by Josh Friedland, Christine Freisinger, and David Megerle
Christine Freisinger: Good morning. As Frank mentioned, my name is Chris Freisinger. I work at WJE. Presenting with me today will be Dave Megerle, also a Senior Associate at WJE and the Senior member of our Difficult Access Team, Joshua Freedland is a Conservator on our team and was unable to be here for the presentation today. I’d also like to thank Steve and Al this morning for giving the background on the Gateway Arch and then going over the part 1 and part 2 of the investigation and then also Catherine gave a really good summary on stainless steel and some of the issues that we found with the welds and the deposits on the steel. I’d also like to thank Mid-century Modern for having us here today. I’m a Structural Engineer so typically when I attend conferences, we talk about differential equations, lateral-torsional buckling, stability of buildings and I found the presentations yesterday to be really refreshing.
It’s nice to hear how people are discussing how buildings can engage with the public and as we know, the Gateway Arch is one of these structures. How many people have been over to the Arch and actually touched the stainless steel at the base? Most of you? How many people have ridden the tram up to the top? Oh, good portion of you as well. Well, we’ve got some good videos coming up later. That will give you a vantage point of the gateway arch that you probably haven’t seen before so they’ll be coming in Dave’s portion of the presentation. Brief introduction of part three of the corrosion investigation. The team was the National Park Service, the Bi-State Development Agency typically referred to as Metro and then TMR consulting with Catherine Houska.
Wiss, Janney, Elstner Associates, Inc.
No Original Maintenance Plan
As we’ve mentioned before, the Gateway Arch was constructed without means to access the stainless steel for any maintenance over the lifetime of the structure. Since construction 50 years ago, no one’s been really able to get to any of the stainless steel besides what you can touch at the base and then also, the stainless steel that you can get to through the observation deck. There’s a hatch on top to change the beacon light and then you can also take the windows out as I think Steve showed in one of his photos. Our portion of phase 3 was to come up with ways to access the stainless steel in between the base and the access hatch at the top and then also to conduct a series of cleaning trials so that we could develop some recommendations for possible cleaning in the future.
Just to go over a couple of points on the archival research, the exterior stainless steel is a quarter inch plate. It’s type 304 and as was mentioned earlier, it has a number 3 finish. A number 3 finish is a little less than a number 4 finish which is typically what you see in your kitchen appliances. As Catherine pointed out earlier, it’s mechanically applied by passes of polishing wheels or belts. This photo is actually taken from the documentary, “Monument to the Dream.” I don’t know if you’ve seen that but if you go over to the arch, you see it in the museum and it actually has a lot of good information about the construction of the arch and a lot of interesting shots. As has been mentioned previously this morning, there was a lot of discussion about blemishes that were showing up during construction. Through the archival research, we found that there was quite a bit of discussion between the National Park Service, the design team and the construction team on how to possibly protect the stainless steel.
They came up with a series of ways to protect it but ultimately decided that any means to protect it, would be not really practical or may cause additional damage to the stainless steel when we’re moving the protection onsite. These are some photos of the creeper direct shots so you can see that there were some bolt holes that bolts were attached to the exterior stainless steel and I think there was some shots previously this morning shown of the bolts being removed and re-polishing the stainless steel at those locations. Then there are also some photos shown that while the creeper cranes were being disassembled, there was a cleaning performed down the stainless steel to remove a lot of the grease and the dirt that had accumulated during construction. Based on our research, that cleaning was done with Oakite #33 which is an acidic chemical.
Wiss, Janney, Elstner Associates, Inc.
Planning Access Points
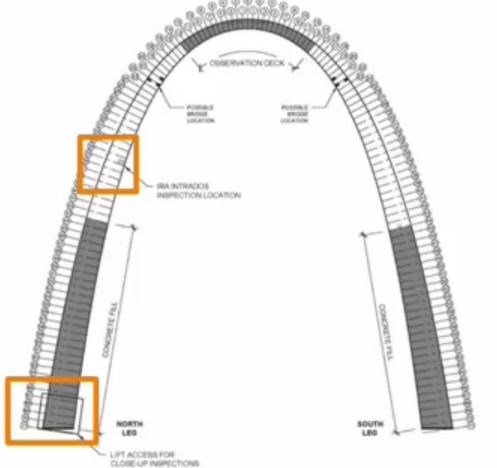
Access to the arch then, where did we want to get too. I’ve circled the 2 locations that we’re able to get to the steel. At the base of the north leg, we access that steel above the bottom 2 panels which is where you can kind of touch it with aerial lifts and then the orange square, possibly about mid-height, is where we were able to use the industrial rope access to actually get Dave onto the intrados to take a look at that stainless steel for us. Additionally, what’s not show in in this figure is Dave and Aaron Sterns from WJE also use the rope access to start at the top of the north leg and come all the way down so that we could kind of get eyes on all the stainless steel in the extrados. To do all this, we worked with NPS and Metro to have safety plan. We needed to provide a safe working environment for the team onsite doing the investigation and we also wanted to provide a safe working environment for the pedestrians.
The arch remained open during our investigation so we blocked off, with NPS’ help, half of the observation deck. We were able to store equipment in the north half of the observation deck and then the deck and then the public could access the south leg. You can see on the north leg, we installed the inner fence. We had a contractor come in and put in a chain-link fence so that when we had the lifts out there, we could park the lifts inside the chain-link fence. Kind of leave stuff there overnight and have a secure work site. For the rope access work, we added a couple of features to the safety plan. You can see on the upper part of the photos, the command center. We had an RV on site and this was kind of our home base. We had a computer set-up in there with WiFi. We had access to all the radios. We have a live video feed for anybody that was actually on ropes on the arch.
We were in constant contact with the park rangers. That was also where we could go to if there was any sort of emergency or rescue protocol that had to be started. There’s also the outer caution fence so we installed kind of like an orange snow fence and that was to keep pedestrians out of the total grounds whenever we were rigging or de-rigging the system that Dave will be describing later. We would close that portion off to pedestrians so that if anything should happen to come loose, there was no chance that a pedestrian would be below the portions we were working in. Then you can see at the south leg, we installed the canopy. As most of you have been to the arch, you know that you sort of past through stainless steel and then continue going underground to access the museum and to get into the trams. We needed to keep that safe for pedestrians while we were doing our investigation.
Wiss, Janney, Elstner Associates, Inc.
Industrial Rope Access
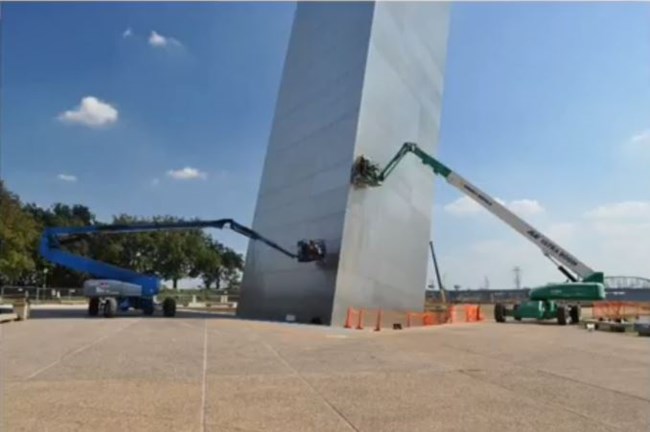
This is an overall shot of the aerial lift access that we had at the arch. We had 2 135 foot aerial lifts on site. You can see that they’re parked quite a bit away from the arch. If you’ve been to the arch at the winter, you may notice that there’s not a lot of snow or ice that accumulates on the pavers. Underneath the pavers directly adjacent to the arch, there’s a snow melt system. We wanted to makes sure that the lift stayed off that. We don’t want to damage the pavers or damage the snow melt system. To get to reach over to the arch which is about 80 feet, we had to get the 135 boom lifts to be able to reach over even though we had only intended on going up approximately 80 feet. We had two lifts on site. The green lift had the welders in it. We had [inaudible 00:08:04] company onsite to help us make the stainless steel wall removals and then also plug those holes. Then the blue lift was the lift that we typically use to access the stainless steel while the welders were onsite.
Now, I’d like to welcome Dave to the stage to go over the industrial rope access portion.
Frank: Hold on. I have to give my proper introduction here and this man certainly deserves an introduction. Other than our tram work leader who is the only one pretty much, in a great long time, to get out on to the top of the arch and he doesn’t really do that once a year to change the aircraft warning light. He stays 2/3rds inside, pokes himself out as far he needs to to change that bulb and then poof! Down it goes. When I met Dave after working here almost 20 years, they let me poke my head out during this investigation. That was a once in a lifetime thing but I didn’t’ get to meet Dave that day but I did see him as he was 40 feet going down the extrados on his ropes. If nothing else, this man is probably the first person to literally be out on the arch since they came down after cleaning and disassembling that [inaudible 00:09:38].
David Megerle, he is the Rope Access Program Manager and a Senior Associate at Wiss, Janney, Elstner Associates in the Denver office but he’s worked as a Leader of the Difficult Access Team since 2006. He’s a member of the Society of Professional Rope Access Technicians, SPRAT. That’s better than splat in his line of business, I would suppose and also the Scaffolding Industry Association or SIA. Dave.
David Megerle: Thank you Frank. Thanks everyone for coming. I’m a little bit nervous. I would rather be hanging off the arch than standing up here talking to everybody. This morning, I’d just like to go through some of the means and methods that we used to access the stains that Steve and Al are so interested in. First, I’d like to go over the WJE’s Difficult Access Team was asked to originally, as only to look at the staining at the 425 foot level of the west intrados on the Gateway Arch’s north leg. A pretty daunting task when you look up at that structure and you go, “Wow, you guys want to look at that over there.” That was quite a complex rigging apparatus we had to come up with. Then, after we started talking with Al and various people in the park service, we were additionally asked to perform an inspection of the extrados on the north leg from top to bottom.
That’s when Aaron Sterns from our Austin office was involved. Aaron is a certified Weld Inspector and so him and I rappelled the north leg all the way down from top to bottom. I believe it was on the 19th of October. A little bit more about the Difficult Access Team. DAT members perform close-up hands on visual inspections, materials sampling and nondestructive testing using Rope Access techniques. 2015 celebrates our 25th year anniversary of the Difficult Access Team within Wiss, Janney, Elstner. I’ve been involved with the Difficult Access Team since its conception. However, I only became an employee in 2006 but I’ve had ties to the Difficult Access Team since its origination. Currently, we have 19 SPRAT certified technicians in the company that have various specialties on our curtain wall experts and our masonry experts, Terracotta experts. WJE’s full of experts.
What the Difficult Access Team does is we take those experts, train them in Rope Access techniques and we actually put the architects and engineers that are going to be designing the repairs and taking this information and putting it into a report. They are the ones that actually go up and do the work typically. However on this particular project, the Gateway Arch, I just threw up my hand and said, “I’ve got to do this one. Do we need an expert to actually rub some Scotch-Brite pads and take some silicone samples on the stainless steel?” I said, “I could do that.” That’s how I got involved. I could’ve handed that out to somebody else but just the complexity of the rigging and where we need to get to, I kind of took that job upon myself. Our DAT team, within the company, works closely with project managers that offers safe and effective access solutions.
Some of the projects that we’ve worked on. This particular 1, everybody probably knows that little project there. San Francisco City Hall was the first out of town project that the Difficult Access Team performed back in 1990. The Denver office is where the Difficult Access Team originated and we were asked to perform 3 inspections for the San Francisco office in 1990 and City Hall was one of them. Tribune Tower in Chicago. I know Steve’s worked on that building quite a bit and WJE has worked on that building a lot. We worked on that building for over 10 years on the Difficult Access Team. Bridge of Americas in Panama City, we did a fracture critical inspection of that bridge. It’s a large bridge that spans over the Panama Canal. The main span is 1,100 feet.
The total span of the 5,400 feet long. We spent 5 weeks down there, climbing on that bridge so it was quite an experience and last but not least, the Washington Monument. We worked on the Washington Monument after the 2011 Virginia Earthquake. We learned quite a bit about you’ll come to the term called wind events. This structure is not very protected. It’s out in the middle of nowhere in the wind. It’s not as high as the Gateway Arch. It’s only 555 feet tall but it’s still is susceptible to all kinds of wind conditions.
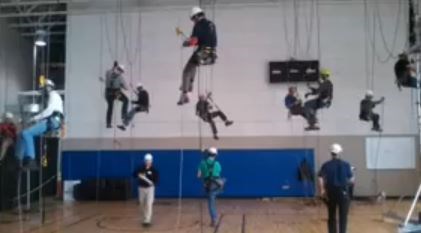
SPRAT, not to be confused with splat, that’s what happens when it all goes wrong, is the Society of Professional Rope Access Technicians. It is a North American trade organization. Wiss, Janney, Elstner joined in 2007 and now we’ve adopted SPRAT policies which include training and certification. The SPRAT certification has 3 different levels depending on how much work experience you have and time on the job. There’s also a 3-year certification process that technicians have to go through. Every 3 years, you have to re-certify at the level you are at or accumulate enough hours to advance to the next level. That picture on the side is one of our in-house training sessions.
Wiss, Janney, Elstner Associates, Inc.
Arch Model for Inspiration
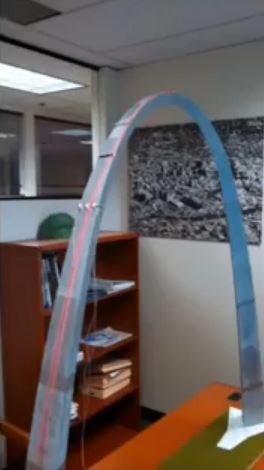
These photos here are a little bit a crude model that I built where the original concepts for the bridle system. I put this model together because I didn’t have anything that resembled a triangle so I took a ruler and I threw it up against the Pellegrino bottle and I tried to figure out how this thing was going to work. My first idea was to obviously wrap a continuous sling around the top from the hatch where it’s only 17 feet wide at the top. If you made sling longer or a specific size, you could just let that sling go. It’s going to stop eventually. That was pretty much the idea that I had and then, the bigger problem was to get to the intrados especially at station 35 where they wanted to go was at the bottom end of the intrados and if you were to hang a plumb line off the end of the extrados and where we wanted to go at station 35, if you were to rappel down and hang plumb, we’d wind up about 17 feet away from the area that we needed to get to.
We had to device a system to keep our ropes on the extrados but more importantly, to get us to this potential, this area right here was the tension sling. What the tension sling did is we had the anchors on the ground and we tensioned that sling and once that sling was tensioned, then we used that sling as a guideline to pull myself down and as I lowered myself down, got to section 35 and then that last little bit, we threw a suction cup on there just so that I could get enough force to hold on and do the testing that we need to do. Guidelines were very important. As you can see, not much has really changed in the system. You’ll see the next photographs of how the idea progressed from this model. We then built a 3-dimensional scale model which most of you has probably seen on display out in the lobby.
This model was quite an inspiration to me. It sat on my desk for, I don’t know, a year and a half, and it was a constant reminder of how can you make this thing better and what’s a different way to do it. But more importantly, it was invaluable in manufacturing this bridle system that we wanted to use to keep us on the extrados but more importantly, get us onto the intrados. It became important because we could use the scale model, we had drawings and we knew that section 29 was in the 32 foot range or 31 foot range width so we knew we had some idea but we didn’t really know the geometry of you hung a plumb line off of section 29. Where is it going to go? Is it going to fall through the area that we wanted to get to? It became really important. The model made the design process that much easier.
The bridle system components, the primary anchors, intermediate anchor straps, secondary anchor, primary and secondary tension lines, primary base, secondary base and anchors. Try to remember all that. This is what it kind of what it looks like as schematic. You can see, 0 is where the hatch is. The primary anchors where we opened the windows, the park service was kind enough to put up a barricade to keep the public from half of the observation level. We opened up the access hatch but more importantly, we opened up the windows of the observation level and we were able to capture the window jams and actually attach to the structure that way. The secondary anchor, the anchor right at 29, station 29.
Station 29, we had a secondary anchor which was a high tension threaded rod with custom made brackets that was attached to the primary anchors with the, we termed it the bridle system but typically in that application, if this wasn’t the Gateway Arch, we probably would’ve used 5/16ths inch wire rope galvanized or just improved plow steel rope but we were concerned about cross-contamination and damaging the monument. That was one of our biggest concerns from the beginning was just the fact that we’re going to walk down or rappel down the north intrados, extrados and lower ropes down. I knew we were going to have an impact on the structure and we wanted to minimize the amount of impact that we left. Even suction cups to me were like, “Wow, I left a suction cup mark up there on the station 35. We went to great lengths to protect the structure anywhere there was metal that touched the structure, it was insulated either with either neoprene or nylon.
The 1 plan view, it’s kind of a hard one to see. This next slide kind of shows everything in use. When you start at the top and you see those brackets as we’re coming down as 1, 2, 3, those are what we call the intermediate anchor straps. Those were important during installation and removal. They kept our ropes positioned so that they wouldn’t fall off the extrados. As we lowered down with the secondary bracket, we placed those to protect our ropes and then we were attached to those and it prevented us from going back and falling off the extrados. Okay, so this is the secondary anchor right there and that’s between stations 28, 29. If you look at this line right here, that’s 1 of the upward primary tension lines and from the model, we knew that we had to make those bridles, the upper bridle slings, 248 feet.
We knew where we needed to go just from having the model in the drawings. We pre-rigged that portion from the primary anchor to the secondary anchor. Everything was attached. The slat was in bags and as we lowered down, we just lowered down and then it got tight at the section that we wanted to go to. Then we lowered down the lower bridle to the ground from the secondary anchor which is these lines here. I know the weld joints, this 1 is a secondary tension lines. There were 2 secondary tension lines. Originally, we were only going to go to the intrados and not do the full extrados inspection. It would’ve been a surgical strike. We would’ve gone in there. We would’ve gone down to the 35th panel and come back up and go to the top. Our intention was never to go all the way to the ground but then we were asked to do the weld inspection full height. Original design only had one guideline going all the way down to the ground to a base anchor but we decided to have two people rappel down at the same time because from past experiences with the Washington Monument, we had some problems with wind so we used those as guidelines to stabilize us as we descended.
Wiss, Janney, Elstner Associates, Inc.
Bridle System & Anchoring
The other important factor about the secondary anchor, once it was tensioned from top to bottom, the base anchor, we had the amsteel line from the top all the way to the base anchors. Once that was position, we had tensioned those lines and then we tightened the secondary anchor. What that provided us with is an anchor point on the west end that we could tie the secondary tension line that went from the secondary anchor down to the secondary base anchor. Here’s a shot from the top. There’s the beacon there that everybody’s talking about and what you can see here, these are the bridle anchor straps. It was nice that they kept the windows, they let us keep the windows open which was important to our design because then once we had the bridle tensioned, we could lead that bridle tension overnight and still close the hatch. That was important for the park service to close the hatch every night. We like to have kept it open but couldn’t do that.
The next thing was, the anchors for the 2 rope descent systems used the same anchor points as the bridle but instead of going up and over the outside, they went up into the hatch and then out the hatch and that’s what these 2 rigging systems right here are. These are the two rope descend systems. These are the bridle. This is the bridle anchor and this is part of the primary anchor at the top was a similar threaded rod with custom made brackets that we captured the extrados from side to side and that provided a place to keep the slings in position so we wouldn’t migrate back and forth. This is what it looked like at the observation level so we had these windows opened and then Chuck from the Park Service made this nice little plexiglass little covers but once we had our slings attached, we could put this this plexiglass covers in place and leave the rigging in place overnight, pull out ropes, pull out ropes through the hatch, drop all the rigging from the inside and then close the hatch.
Here’s a shot of our base anchors so this is what it looked like at the base of the north leg. We use jersey barriers as the base anchors and then we tensioned them with a chain fall and we had to redirect the cables or the tension lines of off the structure because we wanted to originally place the jersey barriers right up against the base but they had concerns with the the pavers and the ice melt system. Now, I think we go to the IRA GOPro videos. This is Aaron and myself descending from the top with the secondary anchor. You can see that secondary anchor there and we’re descending and Aaron’s about to place one of the intermediate anchor straps on and these were custom made brackets that we had fabricated that captured the edge of the extrados. That was key to the design. It was that 60 degree angle there that we used for the intermediate anchor straps as well as the primary and secondary anchors.
Every piece of metal that touched the monument was insulated with either nylon or neoprene. You can see Aaron there placing that strap. There’s a shot of the secondary bracket. It’s loose at this point because we’re still moving along.
Where did he go? This is lower rink. I’m sorry. This is how we lower the secondary bracket. We had 2 technicians on the top that was being lowered on that red rope there that you see. I was in radio contact with the two technicians. One person was lowering one side and another person was lowering the other. We had to get a concert effect to keep this secondary anchor point kind of straight. Where we were going at the station 29 was approximately 31 feet wide. We knew that the secondary tension rod had to be obviously better than that and it was 33 feet long so when we started at the top, we had this 33 foot long 3 sections of threaded rebar. At the top, it kind of hung out over the sides of the extrados and kind of had a little big smile to it but once we got down, everything won’t be new. It was going to lock into place at that 29th station.
This is a shot of us lowering down the lower bridle tension lines which we used Amsteel. I don’t know if I talked about that yet but Amsteel was chosen because of it’s wire rope like properties, the stretch properties that it had and it’s often used as wire rope replacement in the construction industry right now but more importantly, we used Amsteel because we didn’t want to cross-contaminate any, we didn’t want to put any metals against the structure or damage it in any way. That’s why we chose Amsteel. It was a tremendous how light it was.
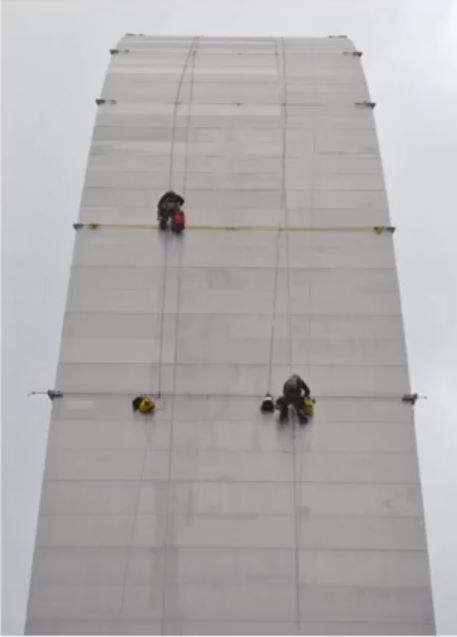
This is us setting up for the north extrados inspection, Just doing a little housekeeping there, getting things straightened out. We knew how long it was from the top to the bottom. We had 1,200 foot ropes. We had the marked with 100 foot increments so we knew when we went down to the secondary anchor point there, we knew, we lowered out 300 feet of rope and we had enough rope to work with once we got to that area. However, to do the extrados inspection, we had to get to the secondary anchor. This is what I’m about to do here because we had another set of ropes coming from the top. We called these ropes the highway. What you had to do was you had to get off your descent system and transfer over to the, the highway ropes so that the technicians at the top could lower that rope back down to the ground. We went to the 300 foot level. We did a change over at the 300 foot level.
The technicians lowered our ropes from the top. They lowered it to the 800 foot mark. We knew it was around 750 feet. We had our ropes marked at 800 feet so I went, changed over, lowered my ropes to the ground and then Aaron did the same. Then once all the ropes were down in the ground, we performed our inspection and we used those lower primary tension lines. We were able to clip into those and used those to keep us from migrating of off the extrados in case of any sever wind events.
Wiss, Janney, Elstner Associates, Inc.
Silicone Mold Test Samples
This is one of my favorite videos. This doing the rust intrados inspection. This is Aaron helping me out some edge protection on the rope. That’s the secondary tension line right there. There’s a piece of the Amsteel right here and that’s the one that keeps me in, I use as a guideline that kept me in all the way down to station 35. Just a little housekeeping there. That’s what we call it when you’re fixing stuff up. Do a little housekeeping. You see how I’m attached to that tension line and that’s pulling me in. This is the secondary tension line with the upper anchor point was the west side of the secondary anchor and then that rope went down to the base, but it touched the base at the intrados and maybe it was exaggerated over to the east. Over by the grand staircase.
Originally, we kind of had an idea where we needed that jersey barrier from the model and we wanted to have an exact location. Things worked out a little bit differently. There wasn’t a forklift onsite to move the jersey barrier because it inadvertently got put in the wrong spot but it worked out well for us and we were able to work with where it was. That was a pretty cool little rappel there for me. I really enjoyed that one.
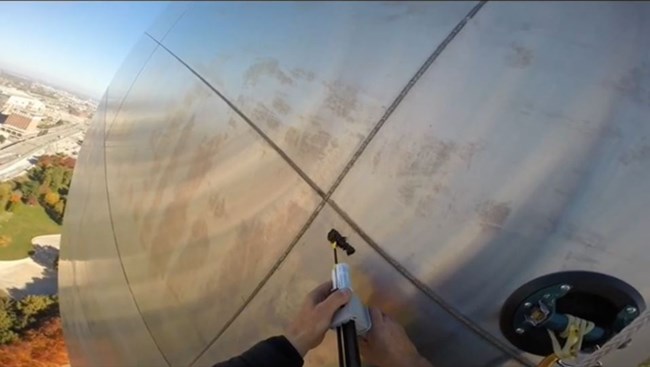
I apologize for all the jerkiness here but this is at station 35. Here I am performing a silicone mold test sample actually. Joshua would be proud of me. This was to get the texture up. They were concerned about if that was really a number 3 finish at those panels. They thought maybe light was refracting at different colors. You can see the suction cups there. The next test we performed was the Scotch-Brite tests. We’ve a done a degreaser. We used isopropyl alcohol and a few other compounds that Joshua had concocted, but more importantly, we used the Scotch-Brite pads three different levels of abrasiveness to see how effective they were in removing any of the stains. I was in contact with Chris and Joshua. Everyone was in the command center at this point and they were all had spotting scopes trained on us.
We were in contact. I had an iPad. I was uploading photographs to them and they were telling me, “Go to your left. What does it look like over here?” We were in constant contact with Chris and Joshua on the ground and Catherine as well and telling what they thought we should look at or what we should do or how we should perform it. I remember it was 12 back and forth. No more, no less. Joshua was very adamant about that. This is my favorite one. I don’t know why. You probably get an idea why. This is after doing the testing and I ascended back up to the secondary anchor and now I’m in the process of getting myself back up onto the extrados from the intrados. Aaron’s kind making some room here for me to come back up.
I gave out a big as yell as well right after they ended this video but I decided to keep it out. You could see there’s a lot of stuff. We had a bag of stuff that we had to do for the testing. Then it was done. From the video, the history of the arch has [inaudible 00:39:01] but there’s one team member that’s missing from this photograph. Dan Gach, one of the members of our Difficult Access Team. We were on this project for I think it was 11 days total and it started to wear on everybody, and Dan had some health issues and he had to leave so he was not in this photograph but it was a team effort. I can’t say that I did this whole thing by myself. It was a huge team effort from everybody from the safety team that made up the safety plans and all the coordination with the Park Service and the barricade systems.
I had enough to keep me busy just figuring out the rigging and ordering all the parts and having everything fabricated and put together but it was definitely a team effort and I’d like to thank everyone involved. I’d like to just thank the park service and WJE for giving me the opportunity to work on such an iconic structure. I will turn it back over to Chris.
Christine Freisinger: Thank you Dave. I enjoy watching those videos every single time. As Dave alluded to, we had to do some logistics on working with Aaron and Dave who were on the ropes. Getting what they were seeing down to the people on the ground. You can see on the bottom photo, that’s myself, Catherine and Joshua manning spotter scopes and radios and pre-planned survey sheets. We really did a lot of work before we actually got on the arch to go through kind of step by step what we would be asking Dave and Aaron to do so that as they were on the ropes, there wasn’t any confusion and we’re all clear on what the tasks were and the goals were on that investigation. As Dave mentioned, we have multiple radio systems. We had our normal DAT radios and then we also had a closed access radio system in case a rescue had to occur. We had multiple spotter scopes. We had the live video feed to the command center. We also have pretty dedicated communication system. All the ground communication went through one person on the radio up to the DAT numbers just so that there wouldn’t be again any confusion during the investigation
Dave also mentioned the iPad. This was actually very interesting. A couple of times, Dave and Aaron would see something and try to describe it and Joshua, Catherine, I , Steve and Al were there too. We kind of look at each other like, “I can’t. I don’t know.” We were like, “Oh send the picture on the iPad.” They take out their iPads, send a picture, use our app, [inaudible 00:41:52], send it up to the cloud, and we would get it back down on our iPad and. Then all of sudden it was like, “Oh, now we see what you guys are are talking about.” Then we could continue to direct on samples to take or cleaning to do at that location. You may have also noticed from the GoPro videos that everything on ropes takes a little bit longer than it would if you were just standing on the ground. There was a lot of patience back and forth throughout the entire team members through that whole 11 day period.
Wiss, Janney, Elstner Associates, Inc.
Visual Anomalies: Blemishes, Deposits, and Discoloration
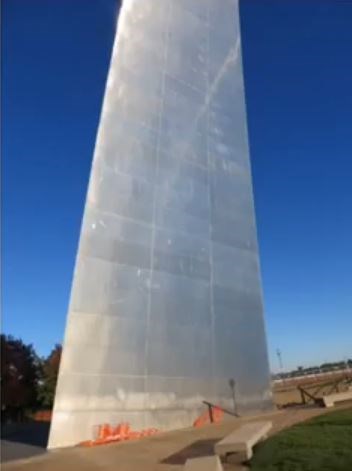
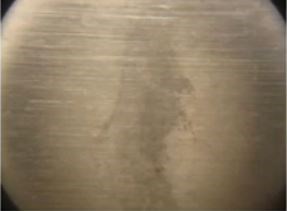
What do we see though the aerial lift access and the rope access. We saw 3 different types of visual anomalies which we categorized as blemishes, deposits and discoloration. From these photos, you can probably see mostly the blemishes which you can see at different sunlight and if you go out to the arch today, it’s a prefect day, it’s very sunny, you’ll be able to see a lot of these results without any spotter scopes or binoculars. Blemishes we defined as alterations to the surface texture. There’s been some discussion on the number 3 finish through the photos on the right, you can see the top photo looks like a pretty good number 3 finish. The photo on the bottom shows some blemishes occurring in the peaks and valleys on those final passes on the belt. Some of the blemishes are more visible at certain sun angles or viewing angles. I will tell you from experience that if you sit out in the sun and look at the arch all day long while you’re field notes, you’ll start to see different things. Not because you’re hallucinating but because the sun is hitting the arch panels at different angles and you can see different variations in the surface texture.
Some of the panels appear lighter or darker depending on where you are. When you’re on the ground, you typically only look up at the panels and what we noticed was when we were on the aerial lifts, we would see a dark panel, decide that we wanted to go take a look at something on that panel, get in the lift, go up to that panel and all of a sudden, the panel would look light because now we’re looking down at the panel instead of up at the panel. There were some interesting aspects of the stainless steel finish that we didn’t observe until we had had this close up access. As I’ve mentioned the blemishes are alterations of a surface finish so you can kind of see in the middle of that photo, there’s a circular marking. What we noticed when we were on the lifts is some of the circular markings, you can wipe away with just a solvent and 1 of them ran and I tried to wipe it away and I was like, “This one is not going any place.” We got out our little field microscope and we were looking at the stainless steel surface.
To my structural engineering eyes couldn’t see much, but Paul Krauss was on the lift with us and the way that the sun was coming into the field microscope, you could actually start to see just the tiniest of scratches on the surface profile. It kind of looked like if you had just a little bit of lint from your sweater and it was laying on something. It was so small that you really had to know what you were looking for and it’s amazing that those very small differences in the surface profile are what you’re seeing when you’re standing at the base of the arch and looking up at it. We also saw weld spatters we’ve talked about before. The photo on the left show some of the spatter. The photo on the right shows some of the shinier welds. Those are from weld repairs that weren’t finished the same as the original welds. At the base of the arch, you’ve probably noticed, there’s incised graffiti and impact damage so we also took a look at that.
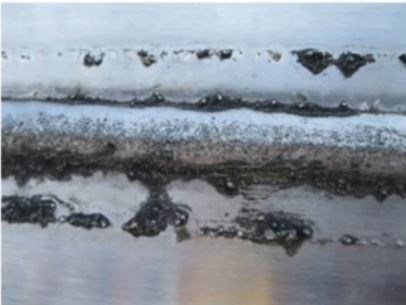
They’re about as tall as you can reach the bottom of 2 panels. For deposits if you take a look at the extrados of either the north leg or the south leg, you can see it looks kind of like a run off pattern. Typically, starting at the field weld. Every other weld is a field weld and those tend to have slightly rougher surface. Here’s another look from the side. If you look kind of closely, the weld, the next photo will show a little bit better, there’s sort of a black line under the weld which is what Catherine showed previously in one of her slides. It’s deposits that are gathering on the rough welds and on the weld spatters. As these deposits sort of gather and then the rain comes and washes off the arch, we’re getting streaking of that material down through the surface finish of the stainless steel.
Wiss, Janney, Elstner Associates, Inc.
Blemishes
We also saw discoloration. This is a picture from the aerial lift and the red line in this photo maybe about the 8th panel we saw up to a height of 5 to 8 panels and so it’s a brownish orange corrosion that you could see at the base, probably chloride corrosion. There’s also red orange corrosion staining that’s associated with the incised graffiti. As Catherine mentioned, people take their keys or pocket knives and sort of scratch their initials into the arch. They’re leaving pieces of iron in those scratches and those scratches are corroding differently than the stainless steel and that’s why, in this photo, you can see that R is quite significant as opposed to some of the other letters surrounding it.
We’re also seeing some heat tints along the welds just from original construction. Cleaning trials. We conducted a series of cleaning trials at the base of the north leg. We tried surface refinishing to remove the blemishes which are again the differences in the surface profile in the stainless steel. We tried solvents and mild detergents to remove the deposits so we’re basically just trying to wash away that black darker material that we saw previously on the slides. Then, we tried some weak acids to remove the discoloration or the surface corrosion. One thing to note is that due to the safety of using acids, it’s not safe to use acids with ropes so we actually couldn’t send any of the acids with Dave onto intrados to try. Here’s another photo just showing the variety of different finishes we can get with a variety of different cleaning techniques. Here’s a view of just the different things that we asked Dave to try.
I think at one point, I said, “Dave, stick out your arms so you can see how far you can reach so we know how much steel we have to work with.” Those 2 squares kind of covered the range that he could do. He couldn’t mover very much because with the suction cups and how we were using that guide wire to get him close. This is one of the more interesting things we found at the arch. This is on the extrados. We tried 2 cleaning trials here. Hopefully you can see it on the screen. When we were onsite with the aerial lift work, we tried the trial on the left. we noticed that after using the weak acids, we could still see the vertical streaks. When we were onsite a couple of weeks later for the industrial rope access work, we tried another spot directly to the right of it and you can see we got the stainless steel to look a little bit cleaner but you’re still seeing the vertical streaks.
Wiss, Janney, Elstner Associates, Inc.
Discoloration
This is when we had started talking about doing the silicone mode. As Dave showed in the videos, he showed a video of one at the intrados and then we also took some silicone molds of the welds but what we also did is at that location trial L, we used the silicone molds kind of right over one of those darker streaks that we had expected to be become clean and the bottom is the schematic of what, if you had the silicone mold and kind of rolled it around in the light, what you could see it the pattern for the finished overlap and where those patterns overlap, that’s where you’re getting a rougher surface and that’s what’s causing some of the additional vertical streaking on the exterior of the arch.
In conclusion, great news. The arch is in serviceable condition without significant distress or deterioration. That’s very good news for the arch and kind of keeping it in the condition it’s in moving forward. Many of the visual anomalies that we saw actually just document the construction of the arch which as we’ve talked about throughout this symposium, that’s a history that we want to keep and we want to embrace. The brownish orange surface of corrosion at the base is likely a result of chloride surface contamination so we can use weak acids to remove that corrosion to begin with and then also work with the park maintenance staff to develop a cleaning system yearly that just uses mild cleaners just to remove the chlorides from the stainless steel to prevent that corrosion from starting again.
Also, with the incised graffiti as Catherine mentioned, we can use pickling to actually remove the embedded iron that’s in the scratches but to actually remove all of the incised graffiti, you’d have to refinish and our trials at the base show that while you can refinish, it just doesn’t exactly look the same as the adjacent surface profiles. With that, I’d like to thank everybody that was involved with the project. A lot of you are in this room today. We’ve been working on this project for a long time and it’s really great to come to this point in the project and know that the arch is going to be around for at least another 50 years. Thank you.
Abstract
The National Park Service and WJE have been investigating the visible stains on the stainless steel skin of the Gateway Arch since 2005 with the field work of the final phase being completed in 2014. During the final phase of this investigation, areas of stainless steel that appeared discolored from grade were examined up-close for the first time using industrial rope access techniques. WJE architects, access experts, conservators, and engineers worked collaboratively using traditional techniques such as field microscopy and high powered spotter scopes as well as innovative technology including helmet mounted video cameras and real time “cloud-based” approaches to facilitate the challenging investigation. The work of all team members, including the National Park Service, was critical to identify, assess, and ultimately develop treatment recommendations for the long-term preservation of the Gateway Arch. The presentation will be jointly given by three members of the WJE inter-disciplinary team who worked closely together during the investigation. Specific topics will include developing the access program, the staining assessment, cleaning trials, and the preliminary conclusions of the study.
Speaker Biographies
Speakers Bios
Joshua Freedland is an Associate Principal at Wiss, Janney, Elstner Associates, Inc. in the Chicago office where he has worked as an architectural conservator since 2001. He is a graduate of the University of Pennsylvania, and Professional Associate and past Chair of the Architectural Specialty Group of the American Institute of Conservation (AIC). He has extensive experience with materials conservation of historic buildings. Many of Mr. Freedland’s projects have included the preservation of modernist landmarks including the Yale Center for British Arts, the Farnsworth House, and the Hoover Dam.
Christine Freisinger is a Senior Associate at Wiss, Janney, Elstner Associates, Inc. in the Chicago office where she has worked as a structural engineer since 2004. She is a graduate of the Illinois Institute of Technology and the University of Minnesota. She is a board member of Structural Engineers Association of Illinois (SEAOI) and a committee member of the Task Committee on the Evaluation and Repair of Existing Buildings of American Institute of Steel Construction (AISC). She has worked on the assessment of many important existing modernist buildings including the One Prudential Plaza and the Aon Center in Chicago, and Aloha Stadium in Honolulu.
David Megerle is a Senior Associate at Wiss, Janney, Elstner Associates, Inc. in the Denver office where he has worked as the leader of the difficult access team since 2006. He is a member of the Society of Professional Rope Access Technicians (SPRAT) and the Scaffolding Industry Association (SIA). In addition to the Gateway Arch, he has developed the access plan for many significant Projects for the National Park Service including the Washington Monument and Perry’s Victory and International Peace Memorial in Ohio.
This presentation is part of the Mid-Century Modern Structures: Materials and Preservation Symposium, April 14-16, 2015, St. Louis, Missouri. Visit the National Center for Preservation Technology and Training to learn more about topics in preservation technology.
Tags
- gateway arch national park
- mid-century modern structures
- christine freisinger
- david megerle
- gateway arch
- investigating the visible stains on the stainless steel skin of the gateway arch
- josh friedland
- mid-century modern structures: materials and preservation symposium
- st. louis
- stainless steel
- sprat training
- society of professional rope access technicians
- ncptt
- mid-century modern
