Last updated: April 6, 2022
Article
Field Kit and Methodology for Detecting, Measuring, and Remediating Salt Attack (Salt Weathering) in Adobe and Earthen Structures
NCPTT grant number:
P15AP00087
Principal investigator:
Dr. David Rockstraw, Ph.D.
Project manager:
Eric Liefeld-President, Mesilla, Valley Preservation, Inc.
Project coordinator:
Gregg Henry-Member of the Board
Volunteer field consultant:
Pat Taylor- Pat Taylor, Inc.
Executive summary
Salt attack (salt weathering) is an insidious natural process that threatens historic and cultural resources around the world. Driven by capillary action coupled with evaporation of salt-laden moisture, salt attack is accelerating the loss of historic adobe and other masonry buildings in the arid southwestern United States.1 Because salts often provide a footprint for moisture movement, understanding and visualizing salt concentrations can yield useful forensic insights into building issues. Precisely locating and measuring concentrated salts allows them to be targeted for removal as a part of informed remediation-setting the clock back for affected structures.Mesilla Valley Preservation, Inc. (MVP) employed a generous NCPTT grant to design a field toolkit for both collection and accurate measurement of salt loads in the field. MVP then used the tools to evaluate remediation techniques with permeable sacrificial mud and lime plasters. Print, presentation, and video media were created to instruct, communicate, and raise awareness around salt attack and its effective remediation.The grant-related work consisted of three principal components:
- Sample collection kit. The sample collection kit can be used to take incremental core samples of existing adobe (and other masonry) walls. The kit includes a prototype coring tool that mounts in a standard cordless drill. The coring tool allows for sampling at specific intervals in an adobe wall. Samples can also be taken from adjacent soils or when evaluating new materials for salts.
- Sample processing kit. The sample processing kit uses a precision balance and a calibrated portable off-the shelf conductivity meter to accurately measure salt loads in adobe samples. The conductivity meter features a sensitive probe that measures the electrical conductivity of a given aqueous solution. A simple methodology and algorithm provides results in terms of a mass ratio.
- Instructional video series. MVP authored and produced an eight-part video series entitled "Salts of the Earth", which was published on YouTube and physical media. The video series provides background on the process of salt attack, operation of the field toolkit, and advice on the use of sacrificial permeable renders through several detailed use cases.
MVP has presented its salt attack work at the international EarthUSA conference ("Remediating Salt Attack in Adobe and Earthen structures") and other venues.
Introduction
Because salts are often a footprint for how moisture is traveling in an adobe wall, understanding and visualizing salt concentrations can yield useful forensic insights. While salt attack itself is usually easily recognized, microscopic salt crystals and salt concentrations can be essentially invisible to the naked eye. MVP's toolkit is designed to provide information and insights that allow contractors and preservation specialists to specifically target salts for removal or migration out of load bearing structure-either as a part of evaluating existing conditions, or as a part of ongoing maintenance. Goals for our toolkit included the following:
- Locate and measure salt concentrations. Due to their hygroscopic and deliquescent properties, salts are constantly on the move, largely depending on prevailing relative humidity. If we are going to target them for removal, we first have to know where the bulk of the salts are located at any given point in time.
- Operate simply, accurately, and rapidly. We wanted tools to provide accurate, rapid, and repeatable answers in the field, and to be as simple to operate as possible. Ideally we want results to be available the same day that samples are taken, in order to precisely locate salts in affected masonry.
- Process different types of samples. Measuring different kinds of samples is a priority. For instance, it might be useful to simply compare a suspect sample with a known baseline, or to compare soil samples from different locations. Alternatively, it can be important to verify that new materials aren't bringing in high concentrations of salts.
- Low-cost, off-the-shelf components. We also wanted the toolkit to be low cost. Ultimately our goal is to describe an inexpensive field test kit that contractors and preservation specialists can assemble to suit their needs. Our emphasis is on off-the-shelf components and not proprietary tools and methods.
Methods and materials
As a part of the NCPTT-funded project, MVP developed the following products:
- Sample collection kit. The sampling kit can be used to take incremental core samples of existing adobe walls. This core sampling process should be adaptable to other kinds of masonry as well.
- Sample processing kit. The sample processing kit uses a precision balance and a calibrated conductivity meter to accurately measure salt loads in adobe samples. A simple algorithm provides results in terms of a mass ratio
- "Salts of the Earth" video series. The video series was developed to provide a global audience with basic salt attack background and information as well as training on using MVP's sample collection kit and sample processing kit.
Sample collection kit
Figure 1 illustrates the sample collection portion of MVP's field toolkit in front of a salt-affected wall. The kit includes a prototype coring tool that mounts in a standard cordless drill. The coring tool allows for sampling at specific intervals in an adobe wall.
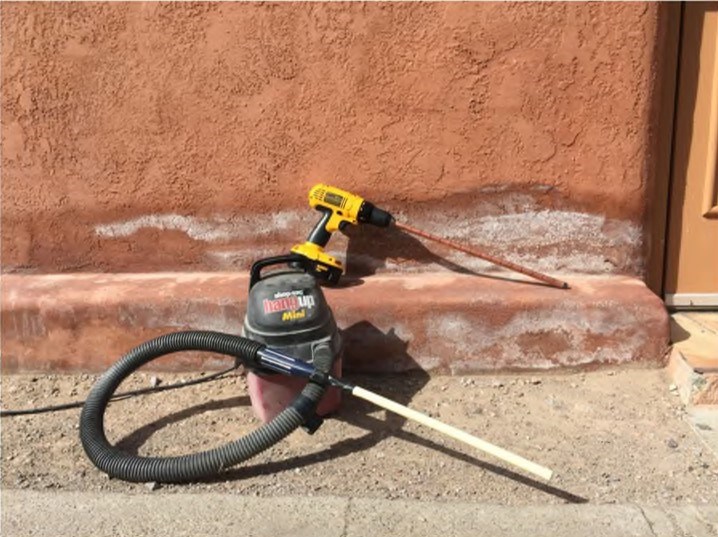
The sampling kit is intentionally comprised of simple components that can be obtained at any hardware store. Components of the sample collection kit include:
- Electric drill. Most any corded or cordless electric drill can be used. Cordless drills are typically more useful for remote sites without power.
- Masonry bit. The drill bit used in our prototype sampling kit is a 5/8-inch masonry bit in an 18-inch length. Different diameter masonry bits could be used, but we found that the 5/8-inch bit worked well for our purposes.
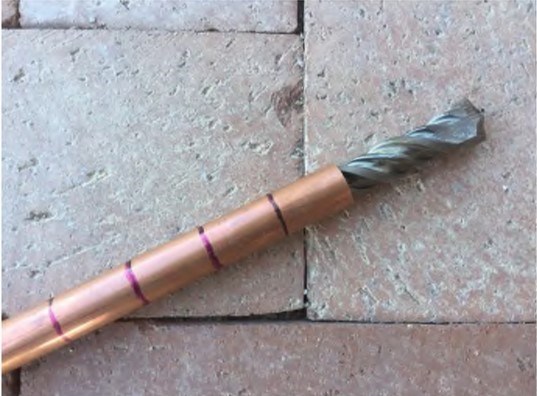
- Collection tube. A collection tube is closely mated to the diameter ofthe drill bit. MVP used a simple piece of ½-inch copper pipe, marked in one-inch increments to guide sampling. The collection tube must slide easily onto the drill bit, allowing the head of the masonry bit to protrude at least to the diameter of the tube (Figure 2). This arrangement lets the tube closely follow the head of the masonry bit into the hole as it is drilled. Loose material then collects in the tube for sampling.
- Vacuum cleaner with custom attachment. A vacuum cleaner with a customized attachment is used to avoid cross contamination of samples. In our case, a simple half-inch PVC pipe was adapted as a vacuum cleaner attachment.
- Zip-lock bags. Simple zip-lock bags labeled with a marker can be used to collect samples.
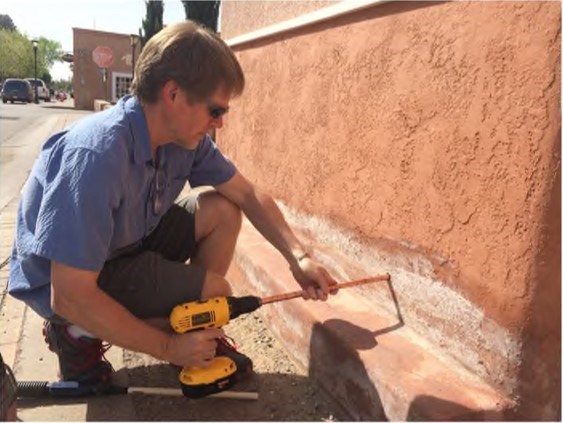
The core-sampling process involves carefully advancing the sampling tool into the wall, with a separate sample collected for each increment marked on the collection tube. Different increments can be used as desired.
- As the sampling tool is advanced into the wall for a given one-inch increment, the collecting tube is held steady with the other hand (Figure 3).
- The sample is retained in the collection tube.
- Removing the sample from the collection tube is as simple as reversing the drill direction over a zip-lock bag while holding onto the collection tube. The process has the convenient function of homogenizing the sample into a fine powder.
- Vacuum the hole. Because salt concentrations typically increase toward the surface of the wall, it is particularly important to try to avoid cross contamination of samples. For this reason, loose material is vacuumed from the hole between samples using the specialized attachment. In our case, a simple ½-inch PVC pipe was adapted to make the vacuum attachment.
The process is then repeated for the next one-inch increment, continuing to the desired depth of the core sample. Adobe walls thicker than 18 inches can be core sampled by drilling from both sides ofthe wall at a similar horizontal and vertical location. MVP has sampled adobe walls up to three feet in thickness using this technique.
Sample processing kit
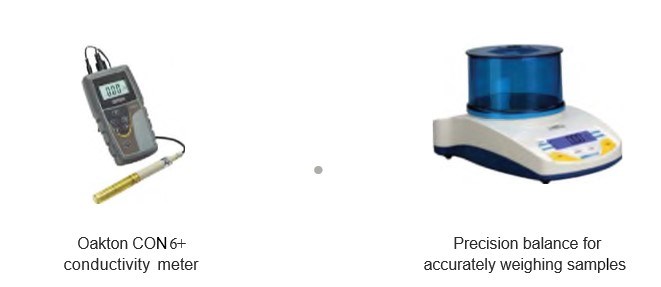
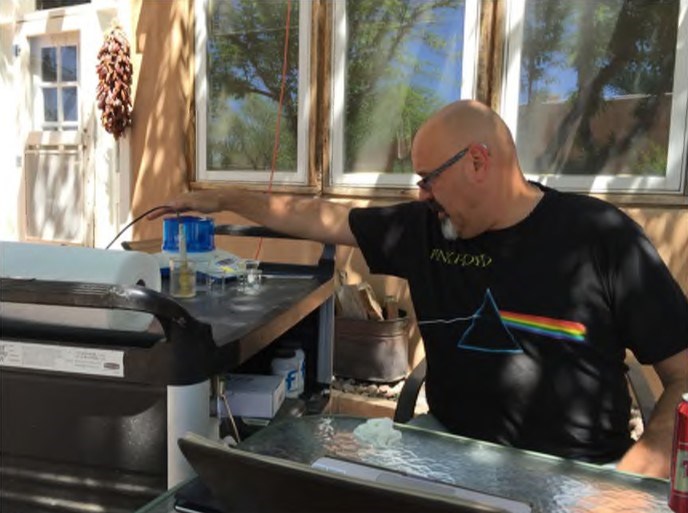
Sample processing is done with an accurate digital balance and relatively inexpensive and a portable off-the shelf conductivity meter (Figure 4). These items are commercially available from multiple vendors. The conductivity meter features a sensitive probe that measures the electrical conductivity of a given aqueous solution. The conductivity probe is an ideal tool for our sample processing purposes because conductivity varies with the salinity of the solution. For example, distilled water has essentially zero conductivity, while sea water has substantially greater conductivity. It is important to choose a meter that is sensitive in the desired range. The meter used in our preliminary testing was an Oakton CON 6+ hand-held conductivity meter. Our process also involves calibration of the meter to compensate for any non-linearity in the signal produced by the meter.
Because the tools are small and portable, they can be used easily in the field (Figure 5). Other than the lab tools mentioned, a computer laptop, tablet, or smartphone can be used to record and graph results.
Calibration and linearity
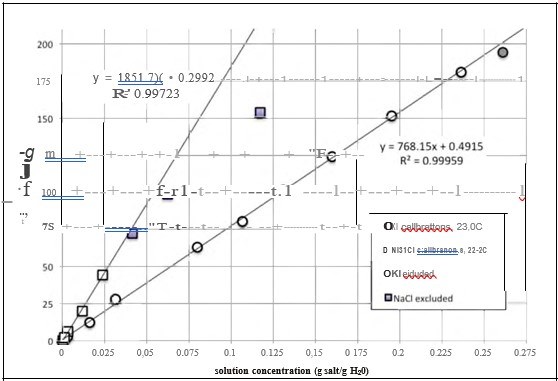
For the conductivity meter to be useful for our purposes, we need to be certain that the tool is capable of measuring what we think it is measuring, at the concentrations that we will be encountering in sample processing. Figure 6 illustrates a typical chart showing calibration and linearity curves for a tested conductivity meter. In this case, both Sodium Chloride (NaCl) and Potasium Iodide (Kl) were tested against known concentrations in aqueous solutions with resulting calibration curves. The calibration curve is then built into the software tools to apply to results for tested adobe samples.In practice, a single-point calibration can yield a calibration constant with sufficient accuracy for our purposes, as described for simpliciry in the instructions that follow. Of course, it is helpful to calibrate the conductivity meter with the actual salt that will be encountered in the field. MVP used electron microcopy and energy-dispersive X ray spectroscopy (EDS) to confirm that Sodium Chloride, is a common salt in our local area.
The sections that follow describe the fairly simple calculations used to compute salinity for each sample. All of these calculations are easily performed in software. For our testing, we utilized a simple spreadsheet with the embedded calculations.
Calculating a calibration constant
Ultimately, we want to know the number of grams of salt compared to the number of grams of adobe for each sample. First, we want to determine the calibration constant using distilled water and a known concentration of salt. The following linear equation relates the standard salt concentration to the measured conductivity.
Equation #1:
- g salt/ g water= C x IC
- C = g salt in standard/ g water in standard x 1 / IC standard (µS)
Kappa (IC) is the measured conductivity of the standard and C is the constant of proportionality between these quantities. The calibration constant can be found from Equation lb as the quotient of a standard solution concentration (in units of grams of salt in the standard per grams of water in the standard and in the range of linearity of the probe) divided by the measured conductivity of the standard.
When creating a standard, it is desirable to identify the concentration that yields a measured conductivity of about 75% of the full range of the probe. With the Oakton CON 6+ conductivity meter, the manufacturer's stated range is Oto 200 milliSiemens (mS). MVP determined that a solution of approximately 0.15 grams of NaCl per gram of distilled water yields a reading of about 175 mS, which provides a sufficiently linear and wide range of use for the probe. A more accurate representation of the measured salt loadings can be obtained by using a multipoint calibration and polynomial representation of the resulting regression line (as shown in Figure 6), but this level of accuracy is probably not warranted for this testing.
Sample processing procedure
Once the calibration constant is known, the sample processing procedure is straightforward. First, a small amount of each sample is mixed with water with precise weights taken of both, following the steps below:
-
Place a 100ml beaker on the balance, and tare the balance to zero.
-
Add a small amount of the adobe sample to the beaker (2-5 g typically results in a salt concentration in the linear range of the probe) and record the weight using the balance. Only the mass of the adobe sample is important, so there is no need to measure amounts carefully.
-
Again tare the balance to zero.
-
Add distilled water to fill roughly 75% of the beaker and record the mass of the water added.
Next, the probe is used to measure the conductivity of the sample.
-
Switch on the conductivity meter and allow it to initialize. Make sure that the probe is connected properly to the meter.
-
Stir the sample to dissolve the salts in the distilled water. Any salt crystals present will dissolve, while the sand and clay particles the adobe sample will not.
-
Insert the probe to measure the conductivity of the sample.
Salinity calculations
The following equation uses the calibration constant that was calculated in Equation #1 to estimate the ratio of salt to adobe in samples of unknown salinity.
Equation #2:
g salt/g adobe=(g salt in standard/ g water in sample) / (g adobe in sample/ g water in sample)
g salt/g adobe= (C x K )/(g adobe in sample/ g water in sample)
This calculation is based on the product of the calibration constant with the measured conductivity from the unknown sample, divided by the ratio of the mass of the adobe sample material to the mass of the water used in sample preparation. Software can be then be employed to calculate an equivalent salt to adobe mass ratio, using the calibration constant and salinity calculations provided above. A simple spreadsheet can help accelerate and automate these calculations.
"Salts of the Earth" video series
MVP's plans initially called for conducting a two-day workshop to train participants on salt attack and using the field toolkit. We initially partnered with Adobe in Action to market the workshop, and worked with Pat Taylor, Inc. to combine the two-day workshop with three days of hands-on preservation training. Unfortunately, though the workshop was offered twice, inconsistent enrollment due to scheduling issues caused us to cancel the class both times.Instead, MVP requested and received a scope change from NCPTT to replace the two-day training with a series of videos. This approach was preferable since it promised to capture the course materials and make them available to a national and global audience for viewing at their convenience. MVP worked with graphics, video, and content-production professionals to create a series of eight videos. Four of the videos were based on custom MVP-developed presentations coupled with recorded voice-over. Four live-action videos were filmed filmed in Mesilla, New Mexico.Titled "Salts of the Earth", the complete video series includes:
-
Video 1. When Salts Attack! - This video serves as an introduction to the series, educating the viewer about the natural process of salt attack and its impact on adobe and earthen structures. The video provides examples of the devastation that salt attack can wreak on historic architecture and adobe masonry in particular.
-
Video 2. Identifying Salt Attack - Viewers learn how to identify salt attack and how best to remediate problems. This live-action video walk-through tour shows salt attack examples at various sites in Mesilla, New Mexico. Close-up inspection of several examples examines failed and ineffective remediation approaches as well as proposing best-practices using permeable lime plaster and sacrificial adobe elements.
-
Video 3. Understanding Salt Attack - Viewers learn about the forces that drive the salt attack process. This video illustrates salt attack damage through multiple photographic examples. Visualizing and analyzing salt crystals is also covered through both optical and electron microscopy.
-
Video 4. Accurately Detecting and Measuring Salts in the Field -Viewers learn about MVP's prototype field toolkit for salt measurement. This video includes descriptions of the tools and process used for drilling core samples in adobe walls, as well as sample processing using portable conductivity meters. Salinity calculations are also included, resulting in plotting a salinity gradient for a given core sample.
-
Video 5. Remediating Salt Attack with Permeable Sacrificial Renders -Viewers learn about salt attack remediation best practices in adobe and earthen structures. This video focuses on the importance of permeable renders and other sacrificial elements for remediating salt attack. MVP's salt measurement field toolkit is used to provide insights and guide remediation in three case studies of salt-effected adobe buildings.
-
Video 6. Adobe Sample Collection -Viewers learn how to use MVP's prototype sampling kit to take a core sample of a salt-affected adobe wall. The video includes selection of a sampling location, use of sampling tools, collection of the sample, and dry-packing the hole.
-
Video 7. Lab Kit and Calibration - Viewers learn the components of MVP's lab kit for testing salt-affected adobe samples. The video describes the components of the lab kit, introduces the conductivity probe, and demonstrates probe calibration with a known standard in preparation for use on actual adobe samples.
-
Video 8. Processing and Analysis -Viewers learn how to use MVP's lab kit to process adobe samples to measure for salt contamination. After calibration, the conductivity probe is used to analyze actual adobe samples for their salt content. Mathematical formulas are provided for calculating the actual amount of salt in a given adobe sample.
All videos have been published on the Internet and are available on MVP's YouTube channel (search for Mesilla Valley Preservation at youtube.com). Preliminary response has been highly positive with many viewers communicating that their perspective has changed with regard to understanding and remediating salt attack issues in adobe.
Results and discussion
Accurately measuring salt in the field has led to the ability to visualize the location of salt loads and plan effective remediation approaches before conditions change and salts migrate with changing humidity or moisture conditions.
Plotting salinity gradients
Processing the multiple individual samples taken in a given core sample results in a salinity gradient. As shown in Figure 7, equivalent salt concentrations are plotted against their linear position into the wall. In this case, two roughly 10-inch-deep core samples were drilled from either side of a 36-inch adobe wall in the historic Nestor Armijo House in Las Cruces, New Mexico (built circa 1867). Together, the two core samples approximate an exponential curve, with concentrations of salts rising dramatically toward the surface of the wall. With this information, we now know precisely how salt levels are concentrated in the wall at the vertical and horizontal location of the individual core sample.
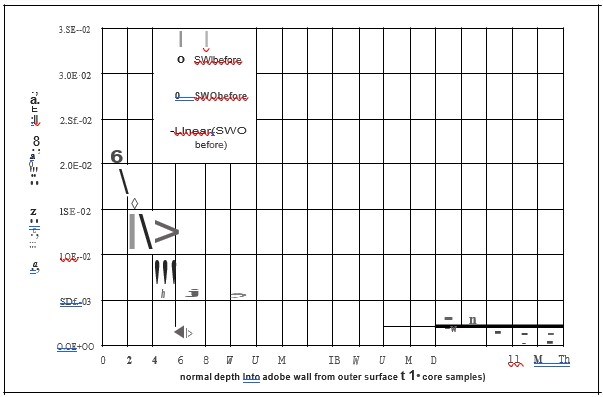
These salinity gradients can be very useful in interpreting existing conditions, and understanding how both moisture and salts have been moving in an adobe wall. This information is also very important for helping us to think about remediation approaches, allowing remediation efforts to directly target the largest concentrations of salt. Since salts are constantly on the move, this salinity gradient also gives us a data point for visualizing changes over time as a part of ongoing monitoring and maintenance.
Understanding the vital role of permeable sacrificial renders in remediation
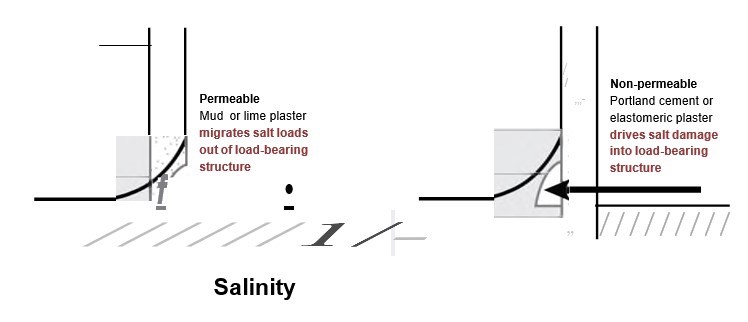
MVP used the toolkit on several active adobe preservation projects in the Mesilla Valley in southern New Mexico. Importantly, experiments with the toolkit reinforced the highly beneficial role of permeable mud and lime renders that act sacrificially. By allowing evaporation to take place at or near the wall surface, these renders and plasters have the unique effect of migrating the entire salinity gradient toward the wall surface. Because of theexponential nature of most salinity gradients, the highest and most destructive concentrations of salts are effectively migrated into the plaster layers and out of load-bearing structure (Figure 8). In contrast, less permeable cement stuccos and elastomeric coatings have the opposite effect of driving moisture and salt damage into load-bearing structure. The importance of this observation should not be underestimated, as described in the case studies that follow.
The sampling and processing components of the toolkit were used to produce salinity gradients that led to forensic insights that aided preservation efforts in salt affected walls:
-
Basilica of San Albino Diocese Building in Mesilla, New Mexico. At this building, the toolkit was used to differentiate between staining produced by salt attack and benign wall staining produced by oxidized paint from a recently-installed wooden drip edge. With the MVP toolkit, the contractor was able to scientifically verify where salt attack was an issue, and where it was not. Testing also verified that a permeable lime plaster succeeded in migrating residual salt loads completely to the surface of the wall. At the start of remediation, the severely salt-effected wall suffered extensive damage sub-florescencing salts. After remediation with permeable lime plaster, residual salts were promoted to harmless efflorescence, where they could be easily removed. Salt loads were dramatically reduced at this sight, setting the clock back for the historic structure (Figure 1 and Figure 3).
-
Nestor Armijo House in Las Cruces, New Mexico. At the onset of remediation, the north wall of the Nestor Armijo House was badly salt affected, with roughly 18 inches of powdered adobe piled at the interior of the wall. Testing with MVP's toolkit was conducted both before and after remediation. Figure 7 above shows the gradient that existed before remediation in the three-foot-thick adobe wall. Exterior cement plasters and elastomeric coatings along with exterior concrete paving had driven ground moisture to the interior of the adobe wall. Salts showed the footprint for this moisture movement. Remediation consisted of basal wall repair and replacing non-permeable plasters and concrete paving with permeable lime plaster. Subsequent testing showed a dramatically lower flat salt gradient, with a sharp spike toward the exterior wall. This is a completely ideal result and demonstrates that the natural behavior of the wall had been restored.
-
Padilla House in Mesilla, New Mexico. Testing at this severely salt-affected site was conducted several years after initial remediation. Result showed high levels of stranded salts throughout the adobe wall. This finding was consistent with the history of the wall. Salts were essentially stranded because moisture flow through the wall had been eliminated due to gutters and grading put in place during the initial remediation. Though the levels of salt were quite high, the lack of active dissolution and evaporation meant that ongoing damage was minimal.
Outreach, training, and education
Because salt attack has been largely overlooked as a damaging agent for historic adobe walls, an important part of this project has been active outreach, training, and education. MVP has used the knowledge and tools gained in the execution of this project to educate around the problem of salt attack and remediation best practices.
-
MVP presented a paper and presentation at EarthUSA 2015 titled "Remediating Salt Attack in Adobe and Earthen Structures". The presentation and paper were well received and garnered significant interest from an international audience.
-
MVP has provided in-person presentations to local groups, real estate inspectors, architects, and pre architecture students covering salt attack, the field toolkit, and remediation best-practices.
-
MVP has done considerable pro-bono consulting with home owners and property owners, using salt testing results to help owners and contractors understand the dynamics of salt-affected adobe walls.
Conclusions and Ongoing Work
Porous adobe and earthen masonry are particularly susceptible to the ravages of salt attack. At the same time, adobe presents unique opportunities for effective salt attack remediation. MVP's salt testing toolkit helps field personnel precisely measure salt loads in the field, yielding fast and accurate results. Precise information about salt loads can be used to establish baseline conditions as a component of conditions assessments, and results can immediately and directly inform and guide remediation efforts. The tools can also be used over time as a part of an ongoing monitoring and maintenance program to help understand how salts are moving in the structure.To advance this work, MVP has been selected to present two papers at the upcoming EarthUSA 2017 conference in Santa Fe, New Mexico.Adobe Dynamics 101- Extended. Working with Pat Taylor (Pat Taylor, Inc.) this paper and presentation will provide an updated assessment methodology and preservation best practices for adobe. Salt measurement and remediation will be integrated into state-of-the-art adobe preservation best practices.Salt migration rates in adobe walls. Working with Dr. David Rockstraw and several graduate students in the New Mexico State University (NMSU) Department of Chemical Engineering, an instrumented test wall will evaluate moisture travel and salt migration. The tools developed as a part of this project will be used periodically to monitor salt loads in the test wall.
Acknowledgements
MVP wishes to extend our profound thanks to the National Center for Preservation and Training, the National Park Service, and and Dr. Mary Striegel, Ph.D. in particular for the generous grant funding and the opportunity to conduct this important work. During product development and testing, MVP relied heavily on the skills, experience, and advice of Pat Taylor, a seasoned professional and veteran of many of the most important and important adobe preservation projects in the United States and around the world.
References
- Cooper, Sonya, Liefeld, Eric, Liefeld, Robert, Henry, Gregg, and Rockstraw, David. "Understanding, Detecting, Measuring, and Remediating Salt Attack (Salt Weathering) in Adobe and Earthen Structures." Proceedings, Earth USA 2013, Adobe in Action, October 4-6, 2013
- Liefeld, Eric, Rockstraw, David, Henry, Gregg, and Taylor, Pat. "Remediating Salt Attack in Adobe." Proceedings, Earth USA 2015, Adobe in Action, October 2-4, 2015
