| A. Title: Dining in Death Valley: Native Tools for Food Harvest |
||||||||||||
|
||||||||||||
| B. Overview of this Collection-Based Lesson Unit Plan |
||||||||||||
|
||||||||||||
| C. Museum Collections, Similar Items and other Materials Used in this
Lesson Unit Plan |
||||||||||||
|
||||||||||||
| D. National Educational Standards |
||||||||||||
Visual Arts English Social Studies |
||||||||||||
| E. Student Learning Objectives |
||||||||||||
Lesson 1. Dining in Death Valley: Native Tools for Food HarvestAfter this lesson, students will be able to: |
||||||||||||
| F. Background and Historical Context |
||||||||||||
The Timbisha Shoshone say that they have resided in the Death Valley region since time immemorial. “Timbisha” roughly translates as “red rock face paint,” in reference to a vivid mineral deposit located near their village. The Timbisha were a hunting and gathering community, residing in the spring-fed mesquite groves of Furnace Creek in the winter. The seeds of the mesquite tree were a significant source of protein for the Timbisha, who would ground them into flour using mortars and pestles. The tribe still actively manages the mesquite groves to enhance seed yields. In the summer and fall, they ascend to the Panamint Mountains to escape the heat and gather pinyon nuts, using hooked gathering sticks. Tools made of natural materials, such as the mortar and pestle or pinyon gathering sticks, were essential to successful subsistence efforts in the harsh environment of Death Valley. |
||||||||||||
| G. Vocabulary |
||||||||||||
Mortar: any receptacle in which materials are ground, blended and crushed. Pestle: A club shaped hand tool for grinding or mashing substances in a mortar. Pinyon : Any of several pine trees bearing edible, nut like seeds Organic material: Natural substances derived from living organisms. Reflexed: Bent. Non-perishable: A substance that does not rot or “go bad” quickly. Cultivate: To support the natural growing process of a plant, usually with the aim to produce specific results, such as greater crop yields or a pleasing appearance. Mesquite: A seed pod-bearing tree found in the deserts of the southwestern United States. The seeds can be ground into flour and eaten. Subsistence: The act of sustaining oneself, through food, shelter, etc., at the minimum level necessary for survival. [Back to top] |
||||||||||||
| H. Teacher Tips |
||||||||||||
|
||||||||||||
| I. Lesson Implementation Procedures |
||||||||||||
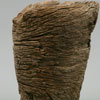
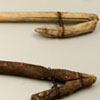
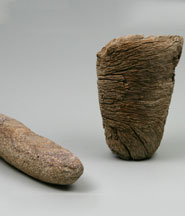
1) Show students photographs of the following museum objects: Mortar and Pestle (DEVA 410 and 442) and Pinyon Nut Gathering Sticks (DEVA 122, 3542, 2401). Walk around room with photos so every student can see them, or project the images onto a screen at the front of the classroom. 2) Students use a “Think-Pair-Share” process to brainstorm the use of these mysterious objects (see section N for an explanation). First, distribute two “How to Read an Object” worksheets to each student, and ask them to “think to yourself” about how the objects were used, and who used them, while filling out the form for each of the two images. Next, have the students’ pair up, and share with the partner their worksheet responses. Both students should modify their answers on the worksheets based on the paired discussion. Remind students that both partners should have an opportunity to talk. Finally, call on volunteers or select specific pairs to share with the class, and collectively discuss how various students read the objects. 3) Select students to read aloud the museum object captions (see below) that name and describe the tools: For the pinyon nut gathering sticks, DEVA 122, 3542, 2401: For the mortar and pestle, DEVA 410 and 442: Explain to students that Native Americans often used organic material from their local environment to construct tools. Even in the harsh conditions at Death Valley National Park, they found resources to help them thrive in their daily lives. 4) In small groups, allow the students to manipulate the modern objects for a few minutes. Place acorns, dried corn kernels, or other grains into the mortar and pestle, so they can ground them into flour. If there are fruit or nut trees in your school yard, students can experiment with the fruit picker outside. Otherwise, set up a safe “mock fruit tree” in the classroom, by loosely hanging objects (for instance, a Styrofoam ball hung by tape) in a well-cleared corner of the classroom. Provide students with explicit safety rules, especially no horseplay with the fruit picker , or demonstrate how fruit picker is used 5) Use large Venn diagrams to guide the class in a compare and contrast exercise between the Native American tools, and their modern equivalents (see Section N for a Venn diagram template). In the left circle, write “Native American Mortar and Pestle.” In the right circle write “Modern Mortar and Pestle.” Make sure the students can see the images of both (taped in the Venn diagram on the board, projected onto a screen, or table copies distributed to students). Ask the students to brainstorm key features, functions, and materials associated with the museum object, and place them in the appropriate circle in the diagram. Repeat this process for the new object. Finally, ask the students whether the tools used by the Native American inhabitants of Death Valley have any similar qualities to the modern tools. Write the similarities in the overlapping portion of both circles. Examples (dependent on the modern image): They both grind hard substances into flour. They both contain natural materials. 6) Perform another Venn diagram exercise using the “Pinyon Nut Gathering Sticks” on one side, and the modern “Fruit Picker” on the other. Examples of common characteristics: They both help you get at hard-to- reach food. They both are bent at the far end. Conclude that there is a lot in common between the tools made by Native Americans, and the modern tools manufactured today. 7) Have students imagine what life was like when there were no stores to purchase tools and groceries. Tell them that people often relied on local materials they found in their surrounding environment to make the things they needed to survive. Inform the students that they are about to experience the same challenge. Pose the question: How could we use organic materials from our local environment to help us survive? Some possible answers: We could use rocks as hammers. We could build a house from sticks. Inform the students that they will have the opportunity to create/invent their own tool using organic materials found in their local community. 8) Ideally, identify a location either in the schoolyard or near your campus where students can harvest leaves, sticks, rocks, pine cones, and other raw materials. (Make sure you are collecting legally – many state and federal parks prohibit collection of natural substances without a permit.) If a mini-field trip is not feasible, gather materials on your own, and bring them into the classroom in boxes, so the students can select their desired raw media. 9) Have students create their own tools using the raw materials. Specify that the tools must serve some essential purpose (harvesting or hunting food, preparing food, storing food, holding water, building shelter, clothing, etc.) Hints: Grasses can be used as a fiber for tying or weaving. If no grasses are present, string can be supplied. Native Americans may also have used intestines, or other parts of animals to make tools that are not readily available, so feel free to substitute brown paper as “leather,” plastic as “bone,” etc. 10) Go around the room and have the students share their inventions, stating its purpose or function. |
||||||||||||
| J. Evaluation/Assessment for Measurable Results |
||||||||||||
Students will be assessed on the construction and purpose of their Native American tool, as well as their ability to orally present their tool to the class. See the Rubric for Native American Tools located under Section N [Back to top] |
||||||||||||
| K. Extension and Enrichment Activities |
||||||||||||
|
1) Tell the students to pay close attention to the sharing session, because after everyone has talked about their tools, they will be tasked with seeking three to four other “tribe members” whose tools will help them survive in a complementary way to their own tools. Example: A student who made a bow and arrow for hunting might find a student who prepared a skinning “knife,” a water receptacle, or a pair of shoes. |
||||||||||||
| L. Resources |
||||||||||||
Timbisha Shoshone part of park website: http://www.nps.gov/deva/parkmgmt/tribal_homeland.htm |
||||||||||||
| M. Site Visit |
||||||||||||
|
||||||||||||
| N. Charts, Figures and other Teacher Materials | ||||||||||||