|
Using the Magic Window teaching tool facilitates a “hands-on” discussion of the essential question of our geology curricula: How do I recognize evidence of geologic change in my environment? Looking through the transparency, you can see two time periods simultaneously. The Magic Window helps you generate questions about how and why changes occur in the landscapes you view.
The Magic Window technique can be part of an inquiry discussion in the classroom, outdoors, or in your neighborhood. Although this teaching tool was developed for the Rocks on the Move curriculum, Magic Windows could be used in a variety of disciplines in which time and landscape are components.
Creating the teaching tool
We needed to find a way to help students think about the processes of geologic change during their field program at Point Bonita in the Marin Headlands. This meant that the teaching tools we developed needed to be suitable for an outdoor program: inexpensive, portable (can fit into a day pack), durable, and able to withstand exposure to varying weather conditions.
The archives of Point Bonita are rich in historic photos, including some wonderful photographs taken by Eadweard Muybridge. The peninsula is exposed to occasional violent storms—landslides are common. The historic photos document 150 years of human interaction with a dynamic landscape with plenty of evidence of erosion and weathering of rocks. For many years, rangers and lighthouse docents have successfully used a selection of historic photos during tours to illustrate aspects of Point Bonita’s history. Our challenge was to find a way to illustrate geologic processes through historic and contemporary photos. We considered ways to create an “overlay” effect as you looked at a particular view, and we thought we could create something similar to the transparency sunlight grids used by young students in Muir Woods.
Our first effort involved making a grayscale image of a historic photo, then copying it onto transparency film and mounting the image on an overhead transparency frame. The photo contained so much visual information that it was difficult to focus on the example of geologic change the photo highlighted. We then used the historic photo to make a pen-and-ink drawing of the photo. We decided which elements of the photo were necessary to include in the Magic Window, and which could be dropped, or de-emphasized. This process worked well, and produced suitable images. 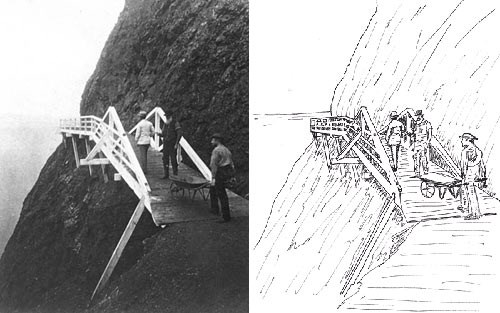
Photo by Eadweard Muybridge (GGNRA Archives) and drawing by Trina Kvale (NPS) Once we knew we could make an image for a Magic Window, we then needed to get as close as we could to the spot where the original photo was taken and align the historic photo to the current view. This involved taking a present-day photo that matched the perspective of the historic photo. We marked the location of each investigation site on the student map and provided a compass bearing so the investigator would be able to line up the window.
We experimented with two types of images: one category included historic views (described above); the other used contemporary photos to highlight recent landslide activity or rock formations. We decided to discard the windows of rock formations (highlighting pillow lava structures, for example) unless they clearly illustrated geologic change, such as our window showing the marine terrace that can be seen from the suspension bridge near the lighthouse, and one that shows a landslide occurring above the boathouse area. In general, the historic photo windows were better at generating student inquiry related to the essential question.
Once we had all of our investigation images on transparency film, it was time to assemble the windows. We found that using three overhead transparency mounting frames stapled together yielded a window strong enough for repeated outdoor use, even in misty weather or light rain. Captions with compass bearings were added to each window. For each investigation, we provided students with the Magic Window, a resource sheet about the investigation site that included the historic photo, and an investigation worksheet that listed the step-by-step inquiry procedure.
Using Magic Windows during our geology field program
We anticipated that students would have some difficulties managing their clipboards, Magic Windows, and resource sheets, so at first, we decided to have students work in pairs, with each pair of investigators completing a worksheet. Unfortunately, this meant that some students were less engaged, or unable to ask their own questions as part of the inquiry. We then decided to have students work in pairs to line up the windows, but each student would have a clipboard with their own map and worksheet. Leaders distributed the resource information sheets midway through the investigation, after students had taken notes and asked their first question and written a possible answer. This process has worked well with our middle school audience, and yields inquiry related to the essential question of the curriculum. During one of our early programs, Francisco Middle School teacher Kelly Taggart coined the term “Magic Window” for our transparencies, and this is what we have used ever since!
Using Magic Windows in the Classroom
Since we currently have the luxury of seeing our Rocks on the Move students in their classrooms before they come to the Marin Headlands, we decided to include the Magic Window pedagogy in our pre-visit presentation, thus streamlining the explanation process during the field program.
For the classroom session, we needed to bring a Magic Window image into the class. We settled on a 1930s black-and-white poster of the Golden Gate Bridge under construction. It would be easy to line up a window to the central element of the poster: the bridge. And it would be fairly straightforward to draw a Magic Window showing the Golden Gate in the 1800s: Just eliminate the bridge from the image and draw a clipper ship approaching the Golden Gate.
Since theMagic Window pedagogy is intended to generate inquiry related to our essential question, our next challenge was to use this classroom activity not just to introduce how to manipulate a Magic Window, but as part of the inquiry process. Our poster and 1800s image gave students a chance to think about time (i.e., history), but not geologic change. In order to generate observations and questions about geologic change, we needed another window, one that either illustrated possible geologic change that occurred in the past, or imagined possible future change.
We decided to try a window with a future scene. While geologists primarily are viewed as investigators of Earth history, looking very deep into the past, much of the science of geology is aimed at being able to predict future events, such as earthquakes, tsunamis, landslides, and the impact of climate change. We drew a window showing the Golden Gate Bridge, but with elevated sea level, and a space-age transport flying over the bridge.
When students used the two Golden Gate windows in class, we found it easy to introduce the Rocks on the Move essential question, and to generate questions about geologic change.
After students line up the Magic Windows, we guide them through a simple inquiry process using the following key questions:
During the inquiry, we allow students to use their own definitions of environment. The essential question, How do I recognize geologic change in my environment?, is meant to be flexible;– environment may be global, or local, even just your neighborhood. “Geologic change” is any change in our planet’s structure or landforms. It may be a slow change, or something that happens quickly (like the changes on the Earth’s surface that occur during an earthquake, or big rain storm). It may be a big event, like the Indonesian earthquake and tsunami of Dec. 26, 2004, or it might be a very small movement of sediment, as seen in clogged gutters and mud puddles. By keeping the essential question flexible, all students have knowledge or experience of geologic change in their environments, and the question is applicable to park and non-park settings.
Assessment
We found that including the Magic Window activity and discussion in the classroom improves the field program: Students remain focused on the geology theme of their visit and are able to discuss the essential question. We conduct a simple assessment of students’ experiences at the end of the field program by having each student write answers to two questions:
1. What is an example of geologic change? 2. How did your visit to the park make it easier to learn about earth science?
Further assessment is available for the teacher when students return to class and complete the post-visit lessons, which include sharing map data with other students in order to complete their geologic investigation maps and discussing future geologic changes that might occur at Point Bonita. |
Last updated: February 28, 2015